Quick Installation Guide ENOS
Version: 1.1
1. Introduction
This quick installation guide provides the basic configuration steps for the new eSIX Xatellite series routers. By following these steps, you can secure the router, customize basic settings, and prepare it for use in your network environment. This guide covers the most important initial configurations that should be completed immediately after installing the router.
The table below shows the factory default settings of the router:
| Model | Device | Retain system logs | Language | eBrain Connection | LAN IP Address | WiFi SSID |
|---|---|---|---|---|---|---|
| VM/eBridge | ebridge | No | auto | enabled | 192.168.11.1/24 | - |
| Max/PowerL | xatellite | No | auto | enabled | 192.168.1.1/24 | eSIX_hhhhhh_2.4/5G |
| ST2/Plus | xatellite | No | auto | enabled | 192.168.2.1/24 | eSIX_hhhhhh_2.4/5G |
| B Series | xatellite | No | auto | enabled | 192.168.3.1/24 | eSIX_hhhhhh_2.4/5G |
2. Document Structure
2.1 Security Settings
- Change the default user administrator password
- Create other user accounts
- Disable or connect to eBrain
2.2 Basic System Configuration
- Set device hostname and timezone
- Configure Time Synchronization
- Set Interface Language
- System Logging
2.3 Network Management
- Change the default LAN IP address
2.4 Wireless Configuration
- Change WiFi SSID and password
- Disable or enable the WiFi radio
3. Security Settings
To protect your router from unauthorized access, please change the default factory user administrator password immediately after the first connection.
3.1 Change the default user administrator password
By default, the user "admin" is the only user with administrative privileges created internally by ENOS (eSIX Network Operating System). Please note that "admin" is a permanent user and cannot be deleted.
3.1.1 Login
Ensure your computer is connected to the router (wired or wireless). Launch a web browser and enter https://192.168.1.1 (for example), and you will see the login page.
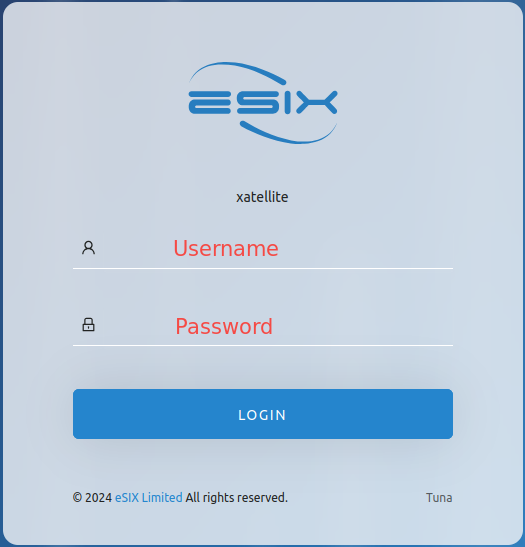
Default Credentials:
- Username:
admin - Password:
eSix6688
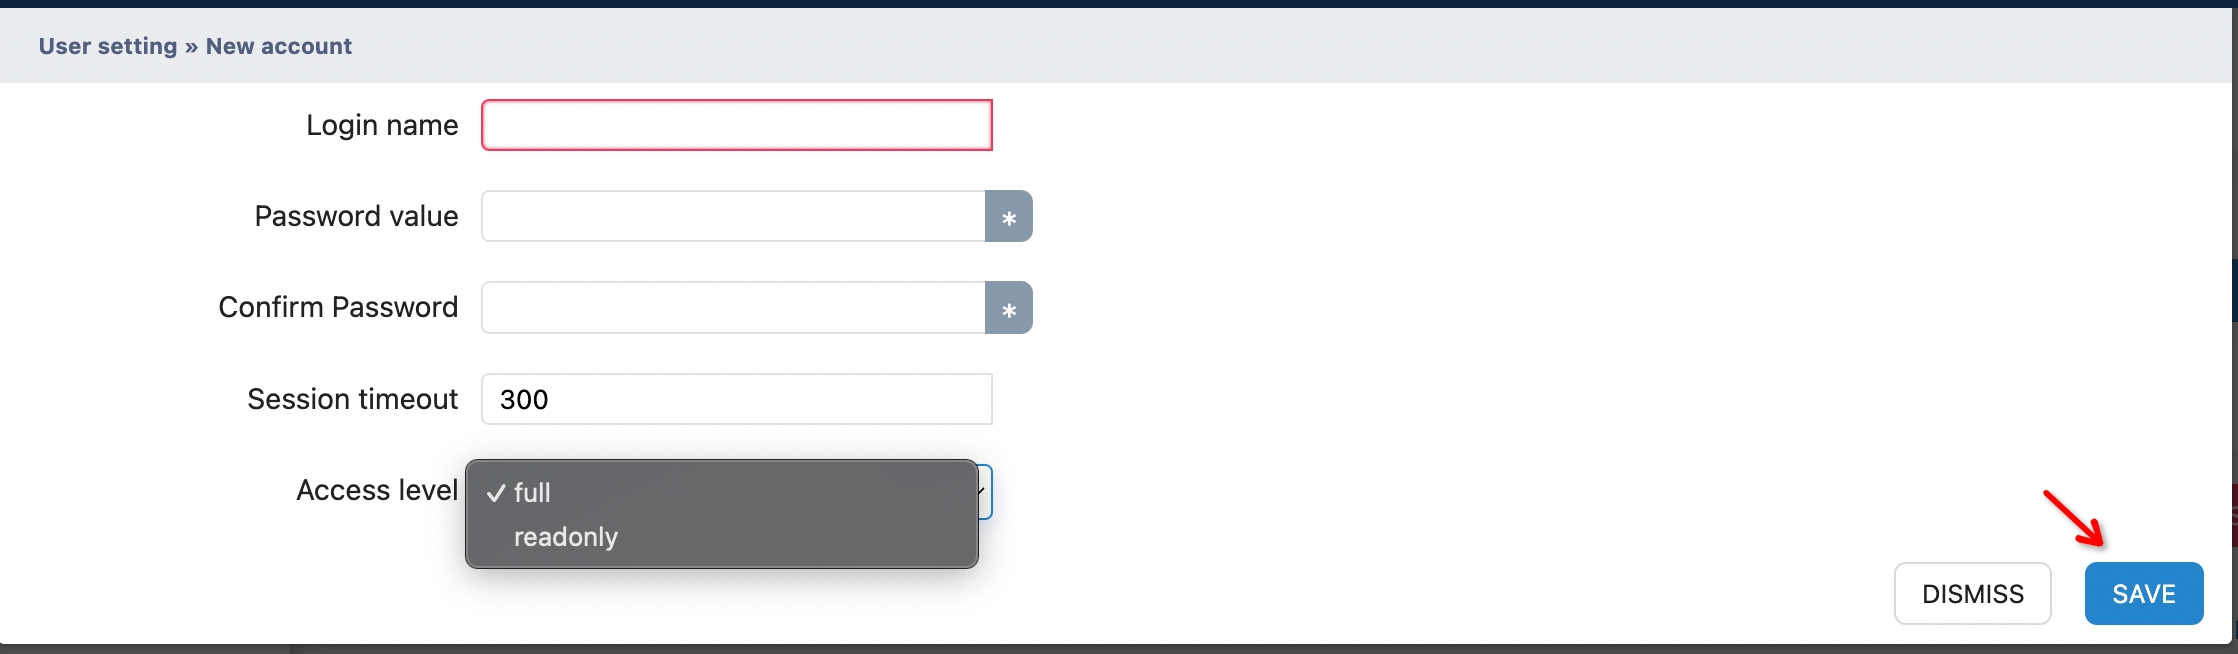
3.1.2 Modify the default password
- Navigate to System → User, and you will see the user settings page
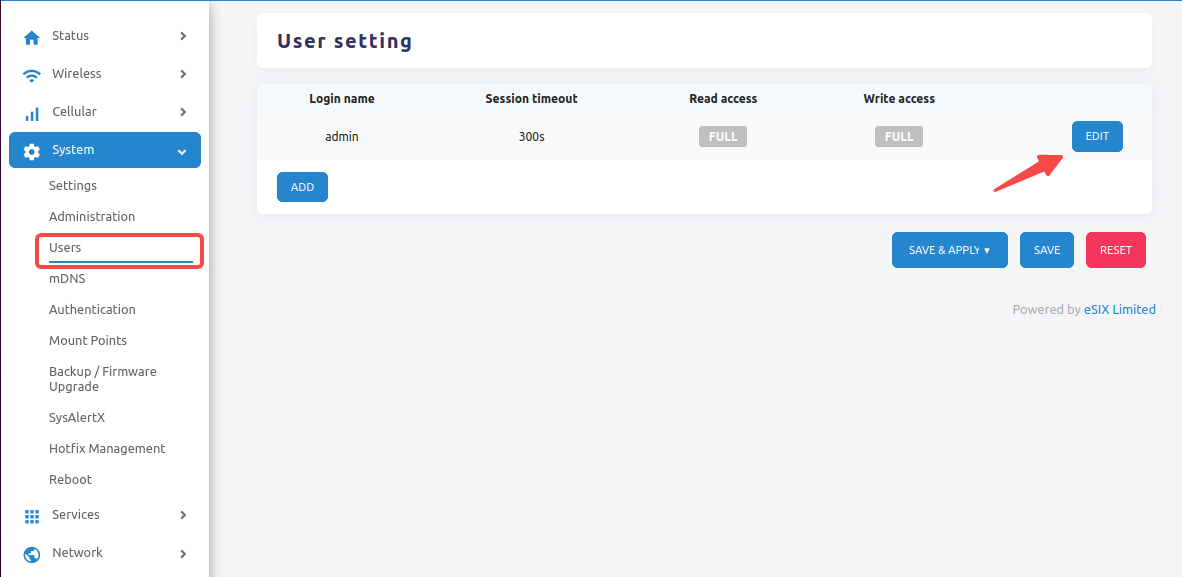
- Click the Edit button
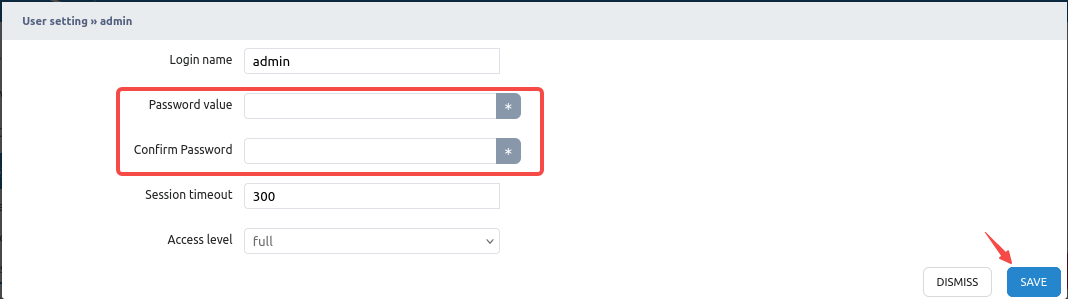
- Enter the new password
- Click the Save button, and return to the user settings page
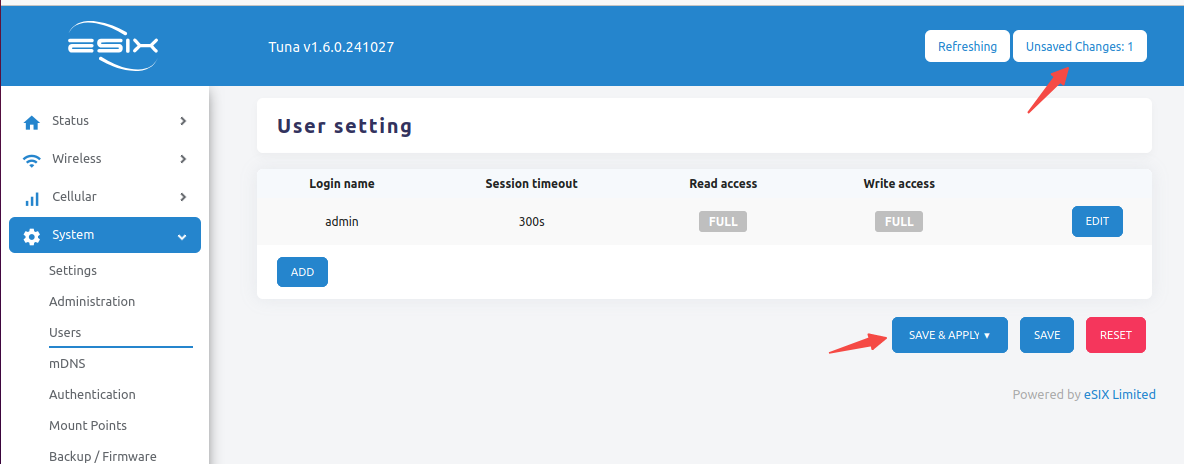
WARNING
Please note that "Unsaved Changes: 1" is displayed in the upper right corner of the page. Click the Save and Apply button to submit the changes. The new password will take effect immediately!
3.1.3 Create other user accounts
You can stay on this user settings page to create other users to access this router.
3.2 Disable or connect to eBrain
INFO
Please note that all Xatellite series routers are set to connect to the eBrain Cloud as a Service for remote management by default. If remote management is not required, please disable this feature by unchecking the corresponding option to enhance security.
3.2.1 Disable the connection to eBrain
You can disable the connection to eBrain to avoid unauthorized remote access to the router.
- Go to the Services → Central Management page
- Uncheck the Enable checkbox
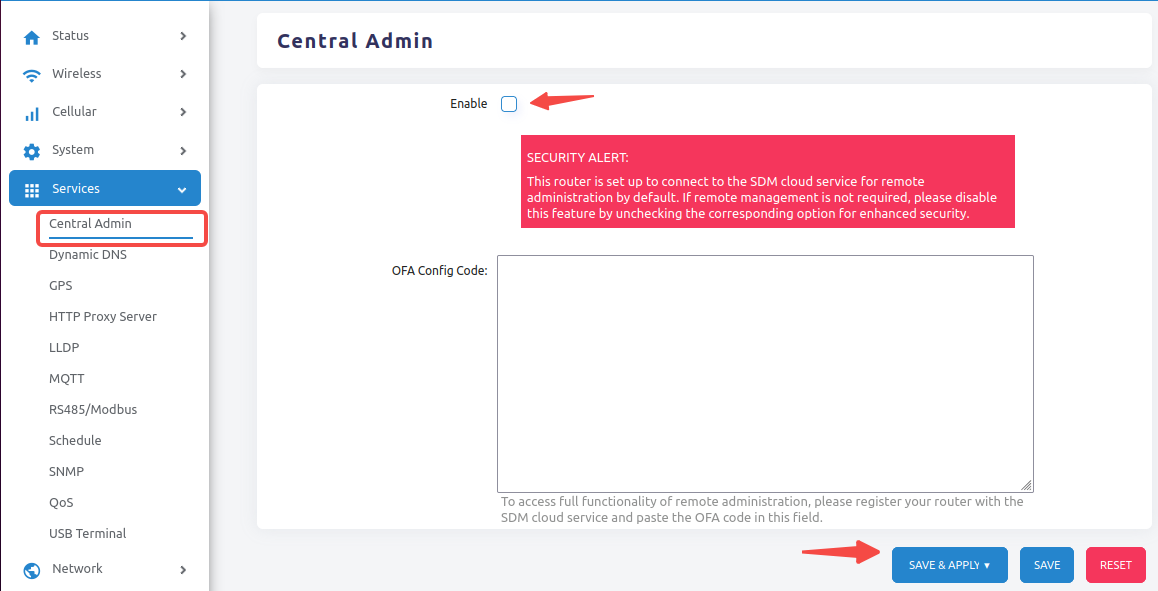
- Click the Save and Apply button to submit the changes
3.2.2 Connect to eBrain
Please consult your dealer for further instructions on setting up the router for remote centralized management.
4. Basic System Configuration
4.1 Set device hostname and timezone
By default, most Xatellite series routers are set to "xatellite" as the hostname.
- Go to the System → Settings page, under the General tab
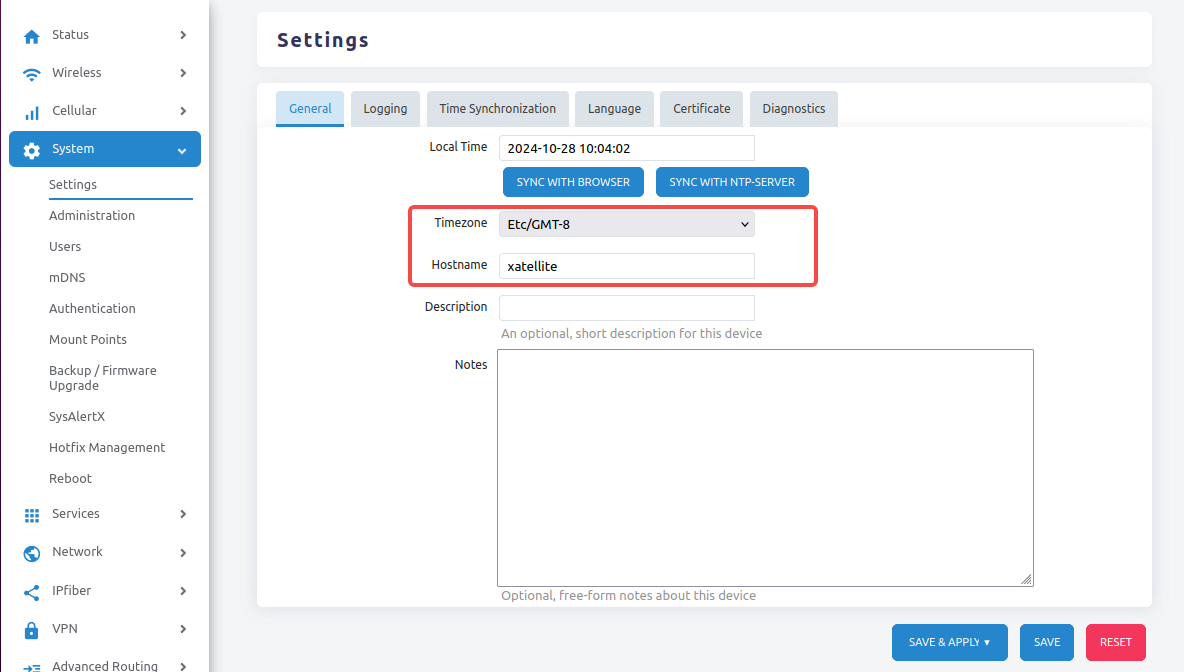
- Modify the hostname and timezone as needed
- Click the Save and Apply button to submit the changes
4.2 Configure Time Synchronization
By default, the NTP server candidate is set to pool.ntp.org, which is a large virtual time server cluster that provides reliable and easy-to-use NTP services to millions of clients (including this router).
- Go to the System → Settings page, under the Time Synchronization tab
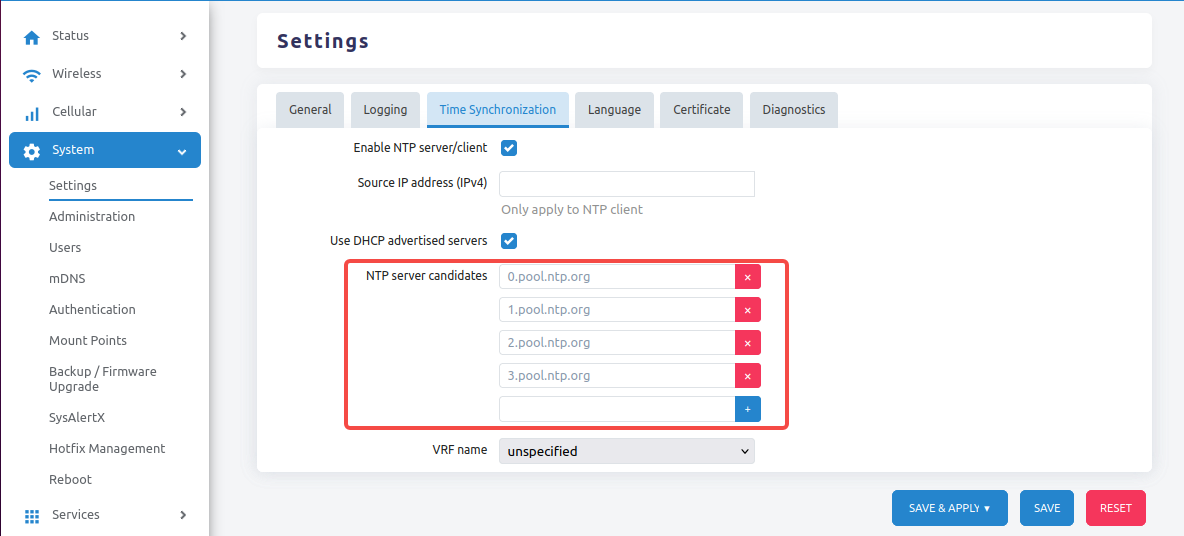
- Custom NTP Server can be used
- Click the Save and Apply button to submit changes
4.3 Set Interface Language
The router uses English by default, and the browser's language setting is set to "Auto". If the browser cannot automatically recognize the language correctly, you can specify a language.
- Go to the System → Settings page, under the Language tab
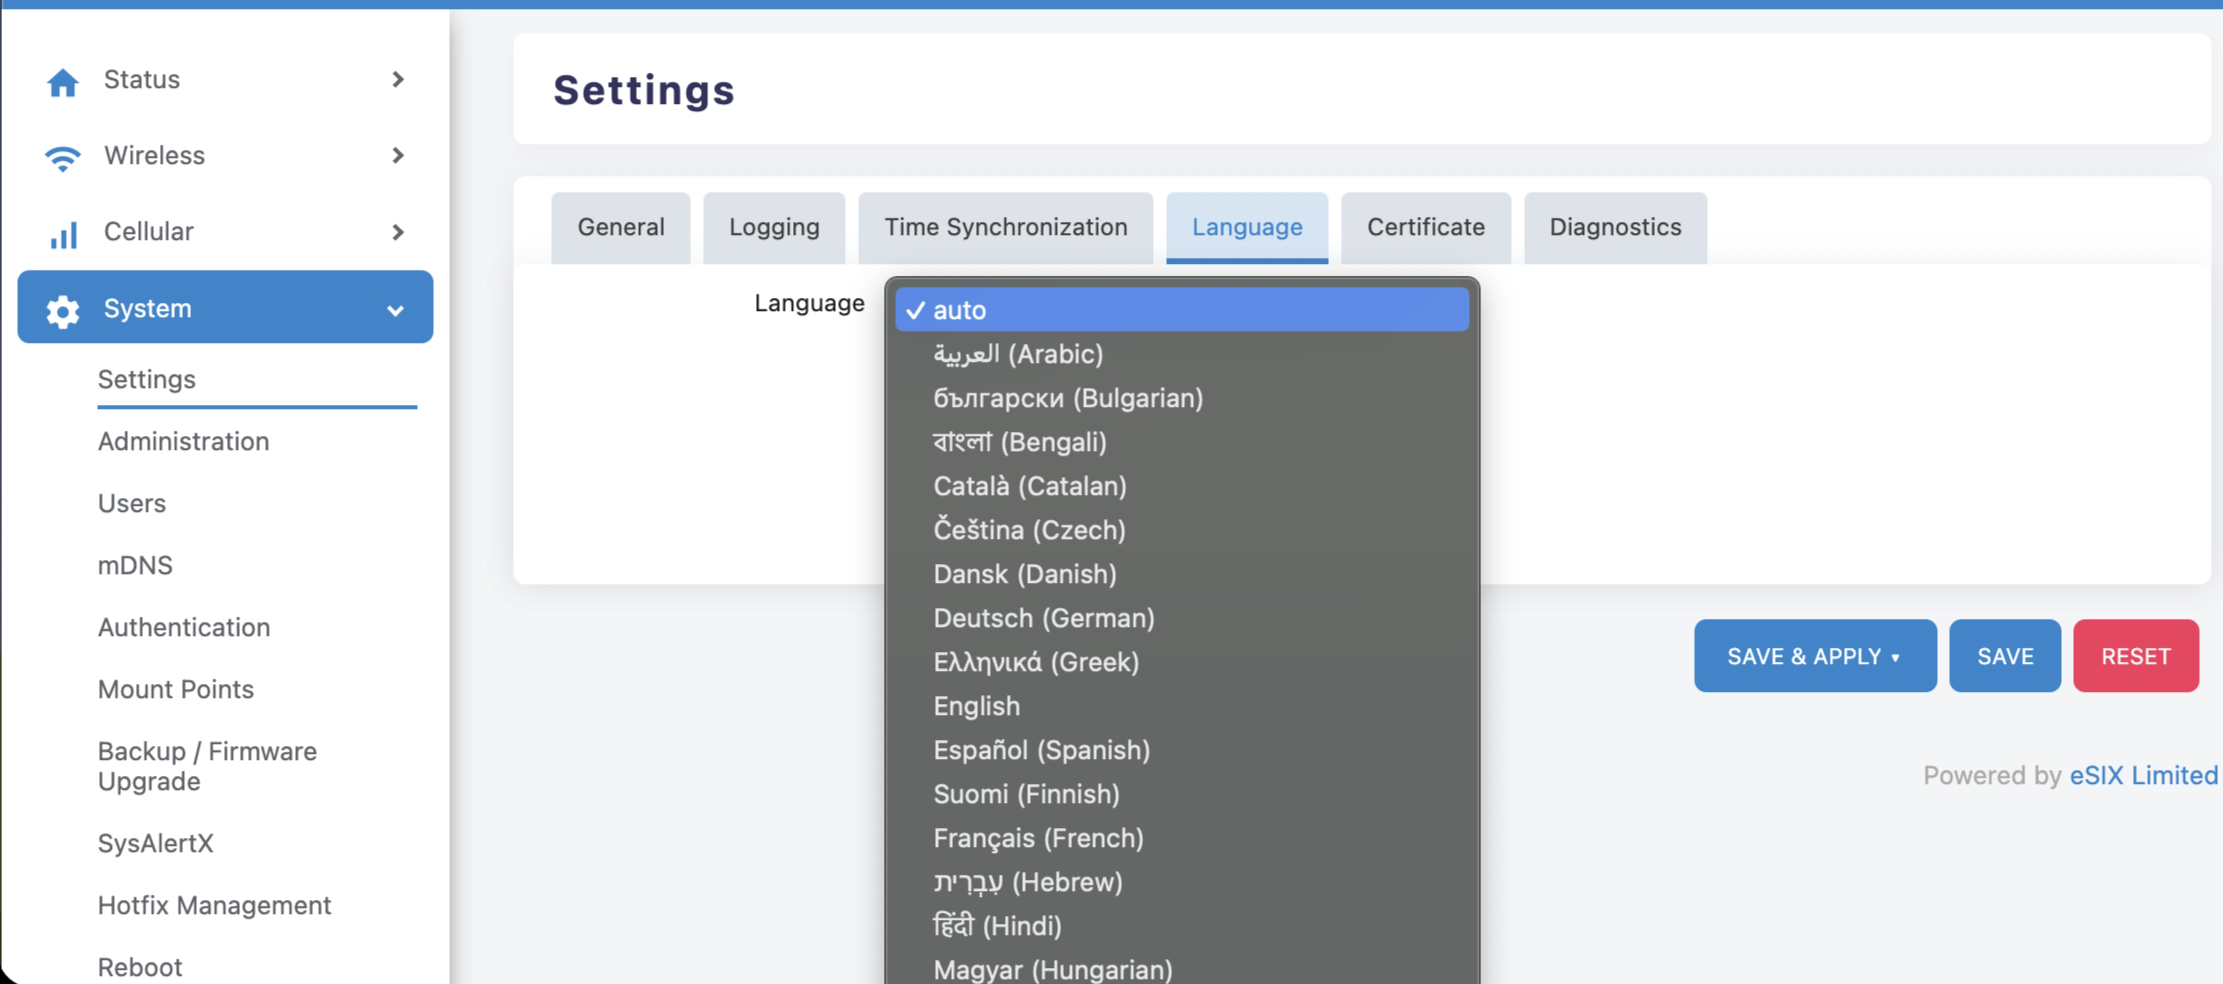
- Select your preferred language
- Click the Save and Apply button to submit the changes
5. System Logging
The system logging function is an important debugging/monitoring feature. By default, system logs are implemented in the form of a circular buffer, where fixed-size records are stored in RAM. A router restart or power cycle will cause the system logs to be lost. To retain system logs for debugging or monitoring, they can be streamed to the system's permanent flash memory or sent to a remote log server via TCP/UDP sockets.
5.1 Stream to the system's permanent flash memory
- Go to the System → Settings page, under the Logging tab
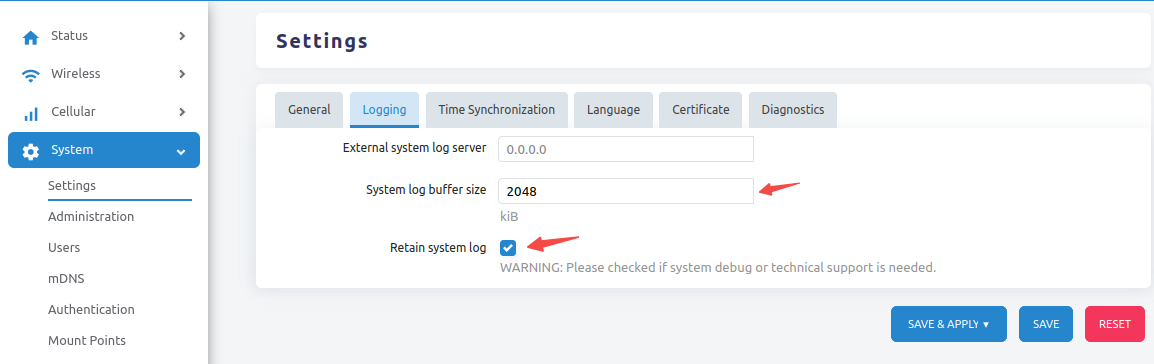
- Check the Retain System Logs checkbox to transfer system logs to permanent flash memory and avoid losing log history
- Change the System Log Buffer Size to a large size of 10240 KiB (10MB) for troubleshooting purposes
WARNING
Retaining system logs to permanent flash memory may shorten the lifespan of the flash memory. It is strongly recommended to transfer system logs to a remote log server.
- Click the Save and Apply button to submit the changes
5.2 Transmit to remote log server
- Go to the System → Settings page, under the Log tab
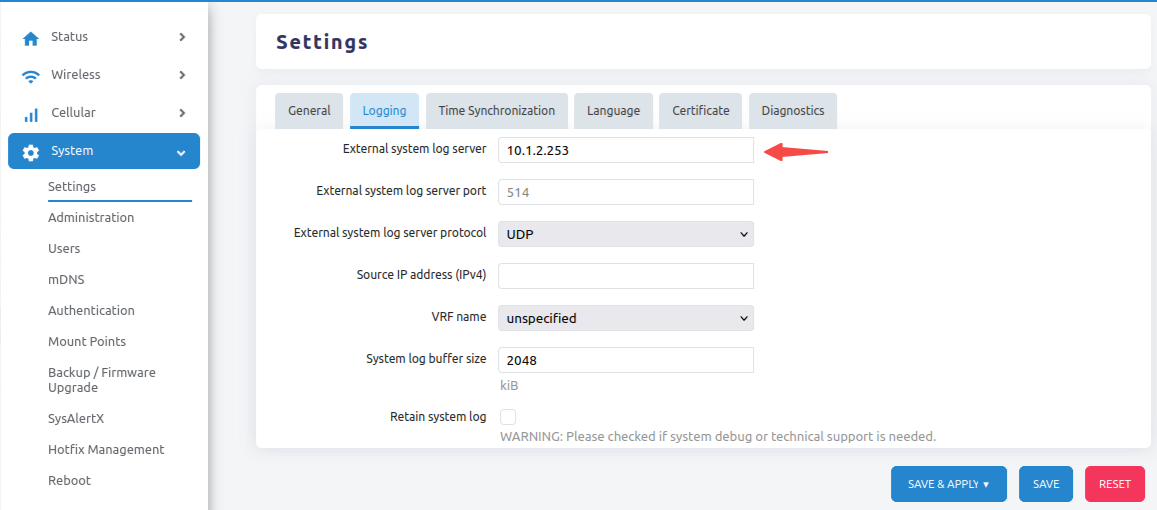
- Enter the IP address of the remote log server and press the TAB key
- The hidden field will be displayed, and the Retain System Logs checkbox will be unchecked
- Keep the System Log Buffer Size at the default value (2048 KiB)
- Click the Save and Apply button to submit the changes
6. Network Management
6.1 Change the default LAN IP address
You can change the default LAN IP address to suit your existing network management style.
Important Warning
Changing the LAN IP address will immediately affect your connection to the router:
- Your current web interface connection will be lost
- You will need to reconnect using the new IP address
Steps:
- Go to the Network → Interface page

- Find LAN and click the Edit button
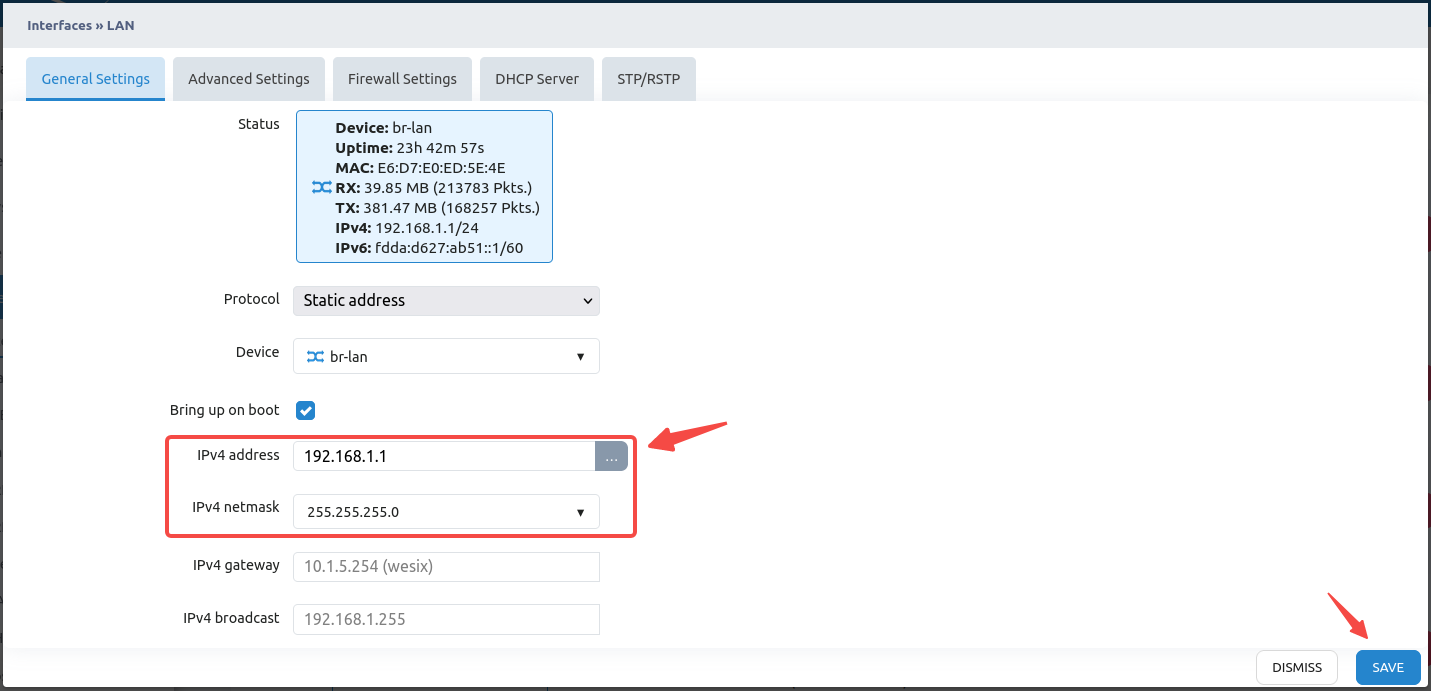
- Enter the new IP address (for example:
192.168.123.1) - After changing the IP address or network mask, click the Save button
- Click the Save and Apply button to submit the changes
A dialog box will pop up:
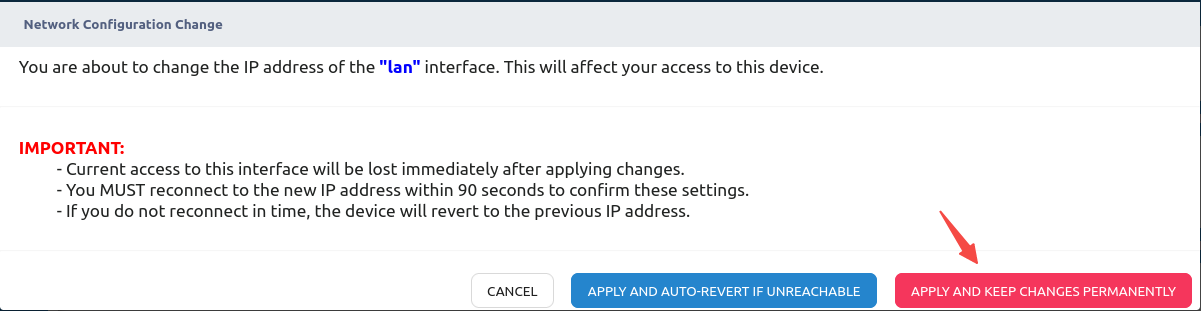
You are about to change the IP address of the "lan" interface. This will affect your access to this device.
IMPORTANT:
- Current access to this interface will be lost immediately after applying changes.
- You MUST reconnect to the new IP address within 90 seconds to confirm these settings.
- If you do not reconnect in time, the device will revert to the previous IP address.
- Click the Apply Permanently and Keep Changes button
- Enter the new IP address in your browser (e.g.,
https://192.168.123.1), and you will see the login page again
Note
- It may take some time for your PC (DHCP Client) to obtain a new IP address from the router
- You can manually unplug and plug in the Ethernet to refresh the new IP address
- In a worse scenario, you may need to turn off and then turn on the router to re-establish the connection
7. Wireless Configuration
If the router supports WiFi 6, it has two radio transceivers: one for 5 GHz and one for 2.4 GHz.
7.1 Change WiFi SSID and password
- Go to the Wireless → Configuration page
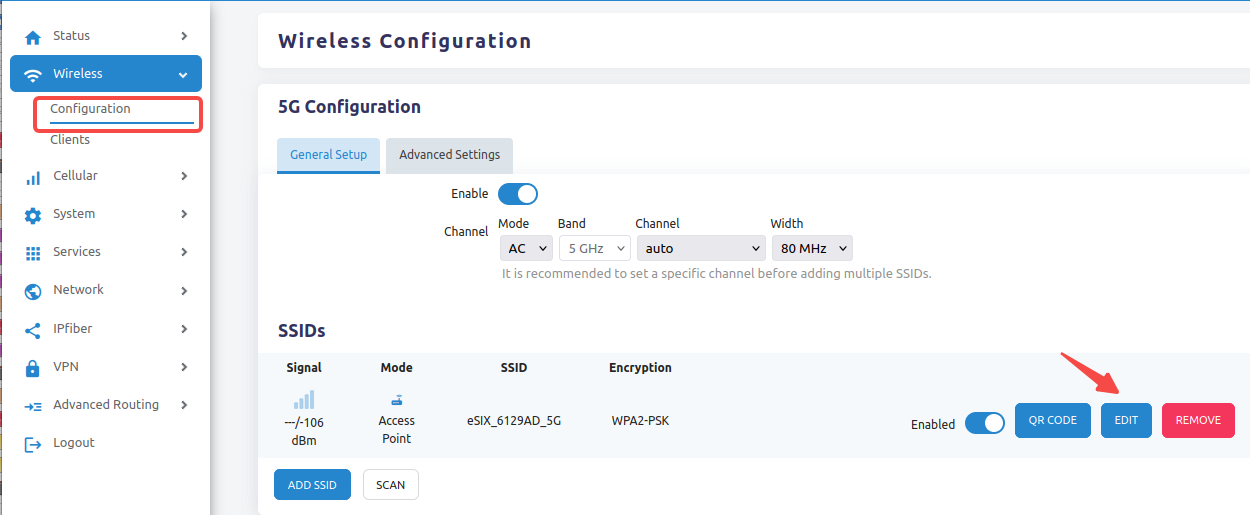
- For example, change the default 5 GHz SSID to "example_5G"
- Click the EDIT button
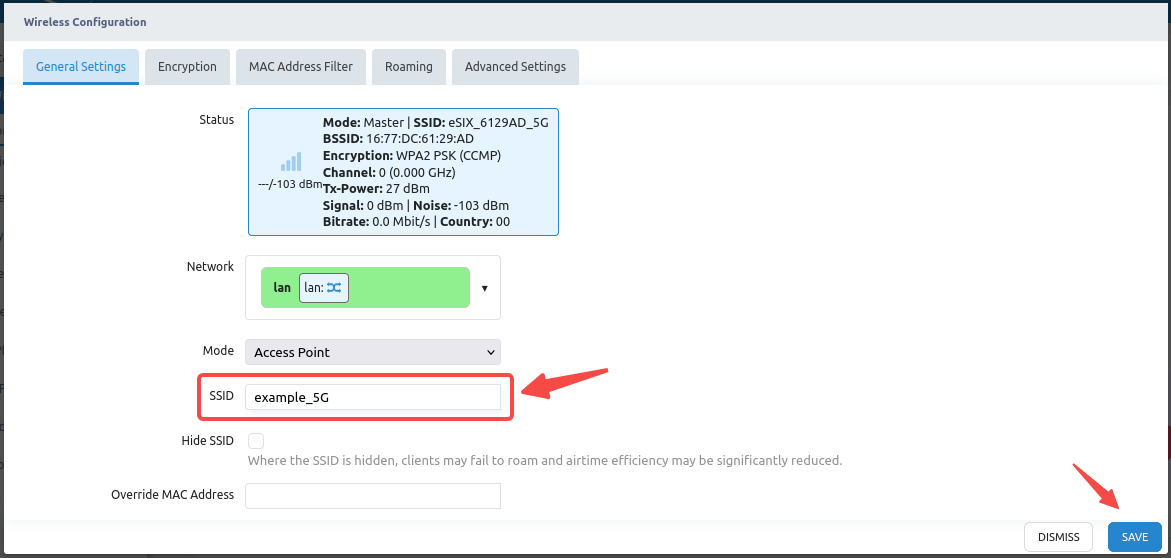
- Modify the SSID name as needed
- To change the password for this SSID, click the Encryption tab
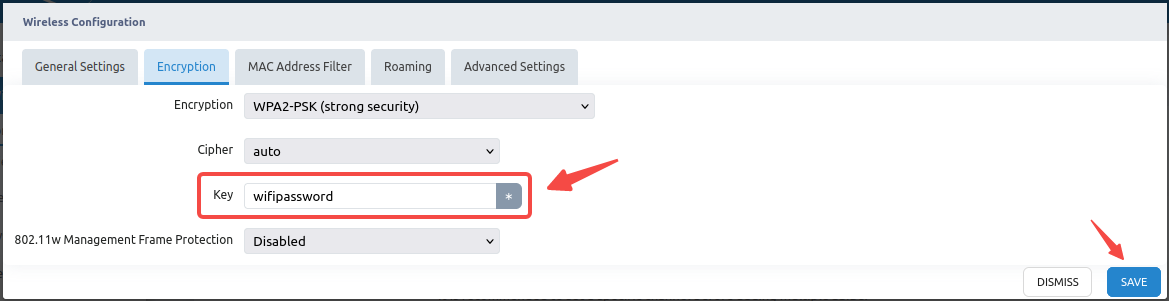
- Enter the new password
- Click the Save button to save all changes
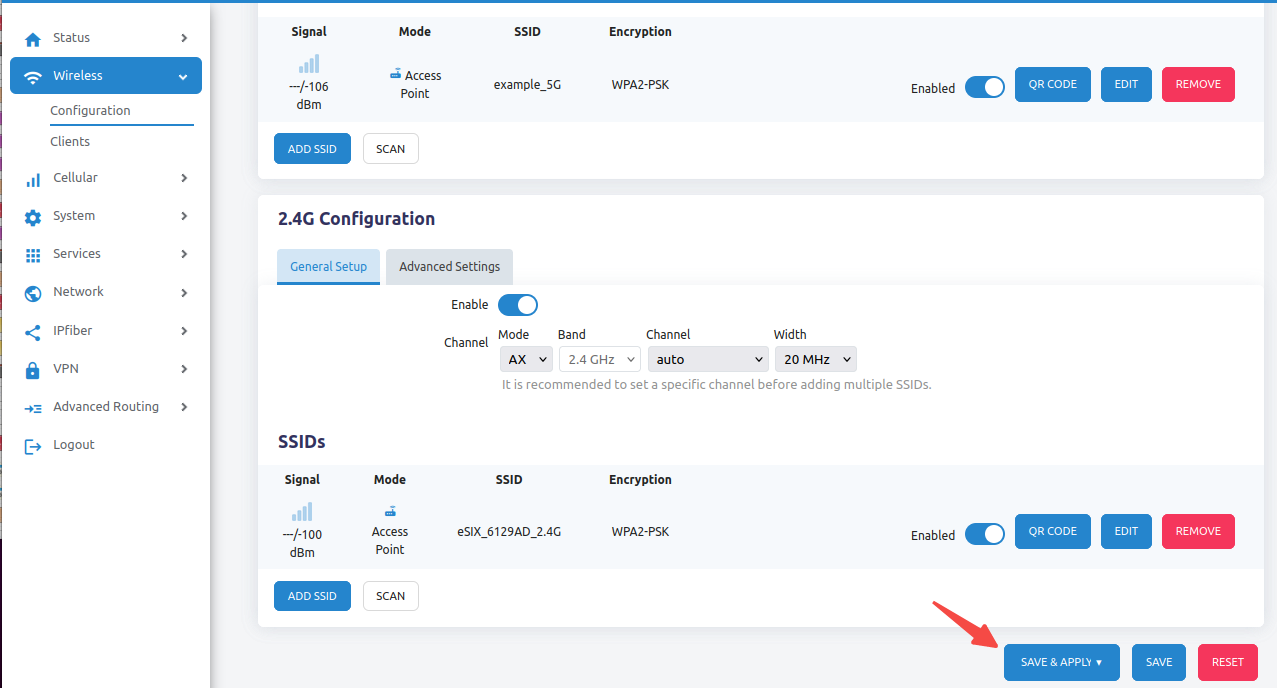
- Finally, click the Save and Apply button to submit the changes
End of Document