1. Introduction
NTP (Network Time Protocol) is a standard protocol used for synchronizing time in computer networks, communicating via UDP port 123, and capable of achieving millisecond-level time precision synchronization.
Core Function
The primary function of NTP is to keep all devices in the network synchronized with a unified and accurate time. It can automatically compensate for network latency and the natural drift of local clocks, ensuring long-term time accuracy.
Working Mechanism
The client periodically sends time requests to the NTP server, and the server returns accurate timestamp information. The client estimates network latency by calculating the round-trip time and adjusts the local system time accordingly. This process continues to maintain synchronization.
Importance Demonstration
Accurate time synchronization is crucial for modern IT systems. System logs require accurate timestamps for troubleshooting, security authentication protocols rely on time verification to prevent replay attacks, and distributed databases need a unified time reference to ensure transaction consistency. Additionally, industries such as finance and healthcare have strict time synchronization compliance requirements.
2. Configuration steps
The NTP function settings page can be found on the System → Settings → Time Synchronization page of the ENOS system.
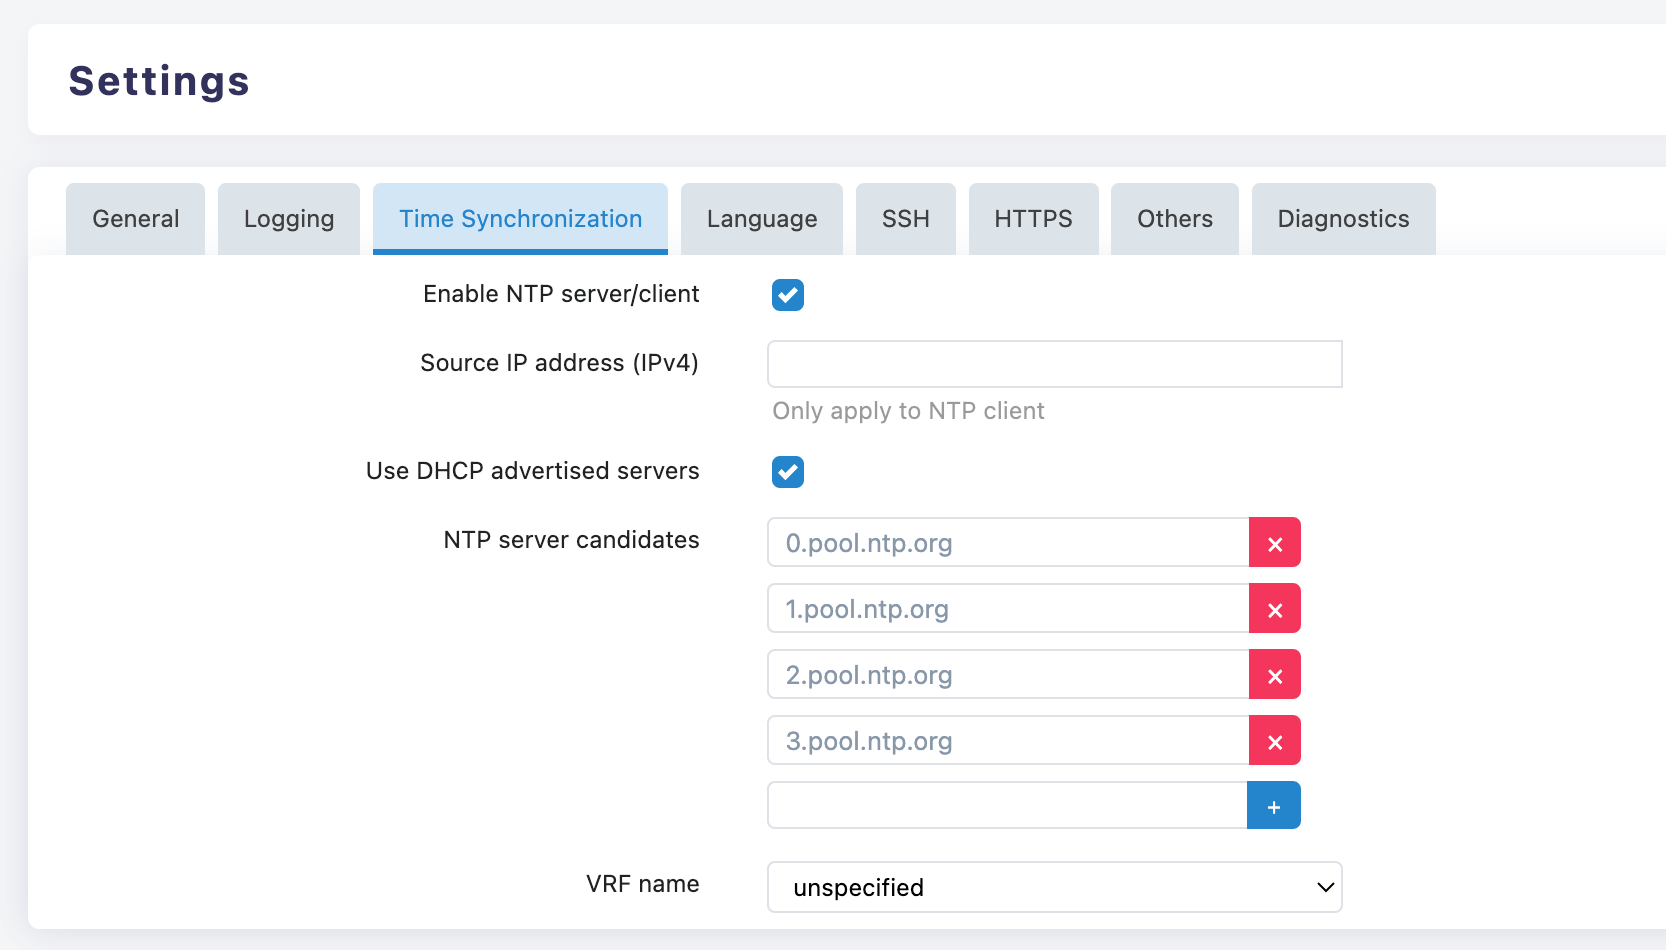
Enable NTP Server/Client
- ✅ Enable NTP Server/Client: Check this option to enable the NTP function
- This is the basic setting for using the NTP service and must be enabled
Source IP Address Configuration
- Source IP Address (IPv4): A specific IPv4 address can be specified as the source address for the NTP Client
- Note: This setting only applies to NTP Client mode
DHCP Server Configuration
- ✅ Use DHCP advertised servers: When enabled, it will use the NTP servers recommended by the DHCP server
- Suitable for most network environments, capable of automatically obtaining the optimal NTP server
Server Management Operations
- Delete Server: Click the ❌ button on the right side of the server
- Add Server: Click the ➕ button to add a new NTP server
Recommended NTP Server
Global Universal Server
pool.ntp.org
0.pool.ntp.org
1.pool.ntp.org
2.pool.ntp.org
3.pool.ntp.org
Recommended Server for China Region
ntp.aliyun.com          # Alibaba Cloud NTP Server
ntp1.aliyun.com
ntp2.aliyun.com
ntp3.aliyun.com
ntp4.aliyun.com

time1.cloud.tencent.com  # Tencent Cloud NTP Server
time2.cloud.tencent.com
time3.cloud.tencent.com
time4.cloud.tencent.com
time5.cloud.tencent.com

ntp.ntsc.ac.cn          # National Time Service Center, Chinese Academy of Sciences
Internationally renowned server
time.google.com         # Google Time Server
time1.google.com
time2.google.com
time3.google.com
time4.google.com

time.cloudflare.com     # Cloudflare Time Server

time.windows.com        # Microsoft Time Server
time.nist.gov          # US National Institute of Standards and Technology
time-a.nist.gov
time-b.nist.gov
VRF Configuration
- VRF Name: Currently set to "unspecified"
- In a multi-VRF environment, a specific VRF instance can be specified
Server Selection Principle
- Geographical Proximity: Select a nearby NTP server to reduce latency
- Multi-server Configuration: It is recommended to configure 3-4 different NTP servers to improve reliability
- Official servers take precedence: Use official server pools such as
pool.ntp.orgfirst
Configuration Steps
- "Enable NTP server/client"
- Configure the source IP Address as needed
- Enable "Use DHCP advertised servers" (recommended)
- Add an alternate NTP server to the candidate list
- Configure VRF (if necessary) based on the network environment
3. Troubleshooting
- If time synchronization fails, check network connectivity
- Ensure that the firewall allows UDP port 123 communication
- Verify if DNS resolution is working properly
- Consider changing to a different NTP server
- Monitoring and Maintenance
- Regularly check the time synchronization status
- Monitor the response time of the NTP server
- Adjust the server list according to network changes
- Keep a backup of the configuration
3.1 NTP client
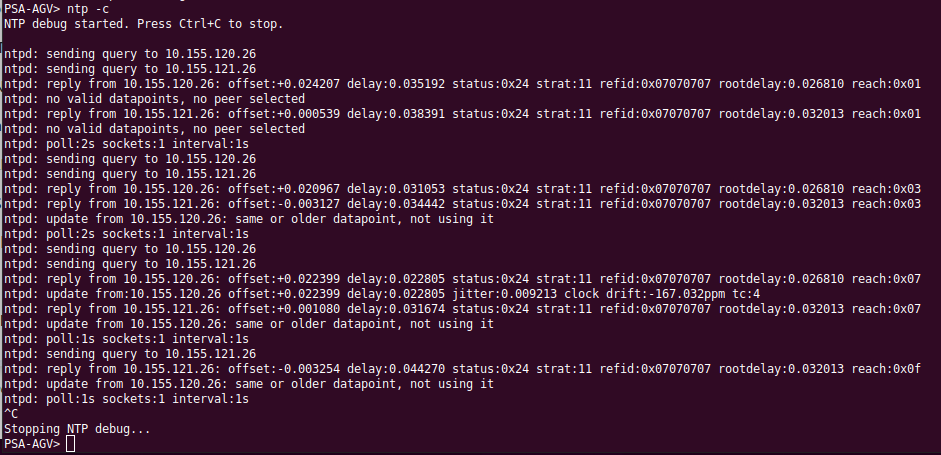
Go to command line
ntp -cIt shows how the NTP client sends query to server and
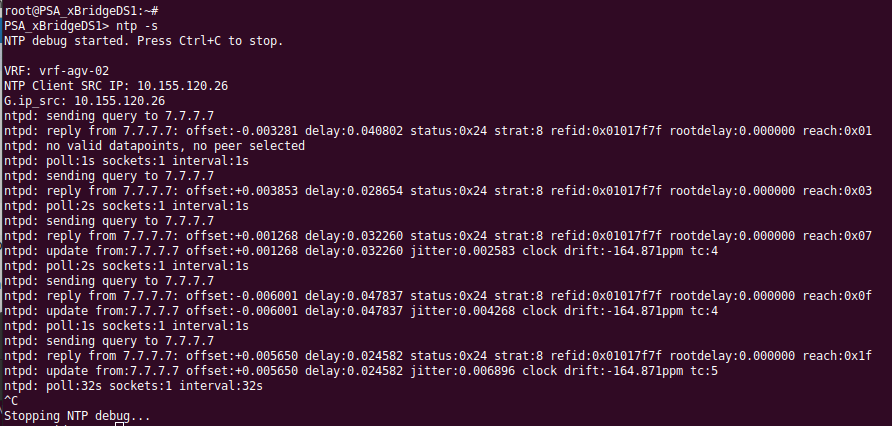
3.2 NTP server
Go to command line
ntp -sIt shows how the NTP server receives and replies to client NTP requests