Quick Setup Guide
1. Introduction
This Quick Setup Guide provides essential first-time configuration steps for your new eSIX Xatellite series Routers. Following these steps will help you secure your router, customize basic settings, and prepare it for your network environment. This guide covers the most important initial configurations that should be completed immediately after installing your router.
The table shows factory default settings of a router:
| Model | Hostname | Timezone | Retain sytem log | Language | SDM Connection | LAN IP address | WiFi SSID |
|---|---|---|---|---|---|---|---|
| VM/eBridge | ebridge | Etc/GMT-8 | No | auto | enabled | 192.168.11.1/24 | - |
| Max/PowerL | xatellite | Etc/GMT-8 | No | auto | enabled | 192.168.1.1/24 | eSIX_hhhhhh_2.4/5G |
| ST2/Plus | xatellite | Etc/GMT-8 | No | auto | enabled | 192.168.2.1/24 | eSIX_hhhhhh_2.4/5G |
| B Series | xatellite | Etc/GMT-8 | No | auto | enabled | 192.168.3.1/24 | eSIX_hhhhhh_2.4/5G |
2. Document Structure
2.1 Security Setup
- Changing Default user admin Password
- Creating Additional User Accounts
- Disabling or Connecting to SDM
2.2 Basic System Configuration
- Setting Device Hostname & Timezone
- Configuring Time Synchronization
- Setting Interface Language
- System logging
2.3 Network Management
- Changing default LAN IP address
2.4 Wireless Configuration
- Changing WiFi SSID & Password
- Disabling or Enabling WiFi Radio
3. Security Setup
In order to protect your router from unauthorized access, please change the default factory user Admin password immediately after the first time connection.
3.1 Changing Default user admin Password
By default, the user "admin" is the only user with administration privilege rights that is created internally with the ENOS (eSIX Network Operating System). Please note that the "admin" is a permanent user and cannot be deleted.
3.1.1 Login
Make sure your computer is connected to the router (wired or wireless). Launch a web browser and type https://192.168.1.1 (for example), you will see the login page:
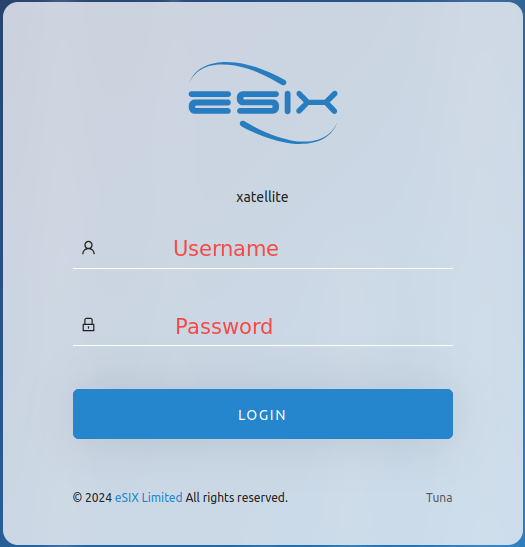
Username/Password : admin/eSix6688
3.1.2 Change default password
Go to "System → Users", you will see the Users Setting page
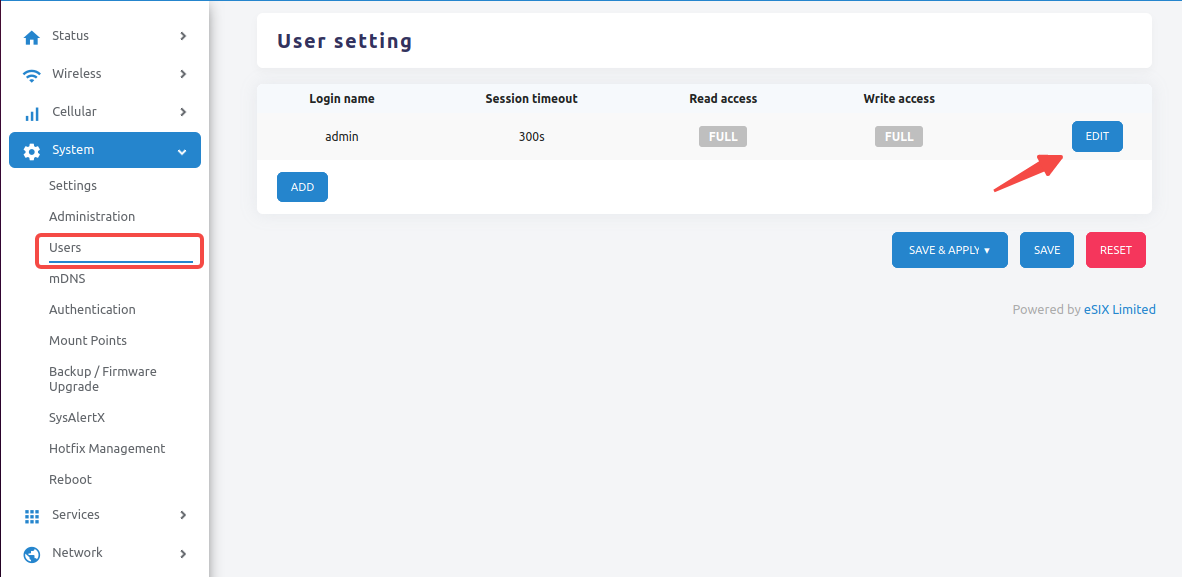
and Click the "EDIT" button. You will see:

Key in the new password and click the "SAVE" button. You will return to the Users Setting page:
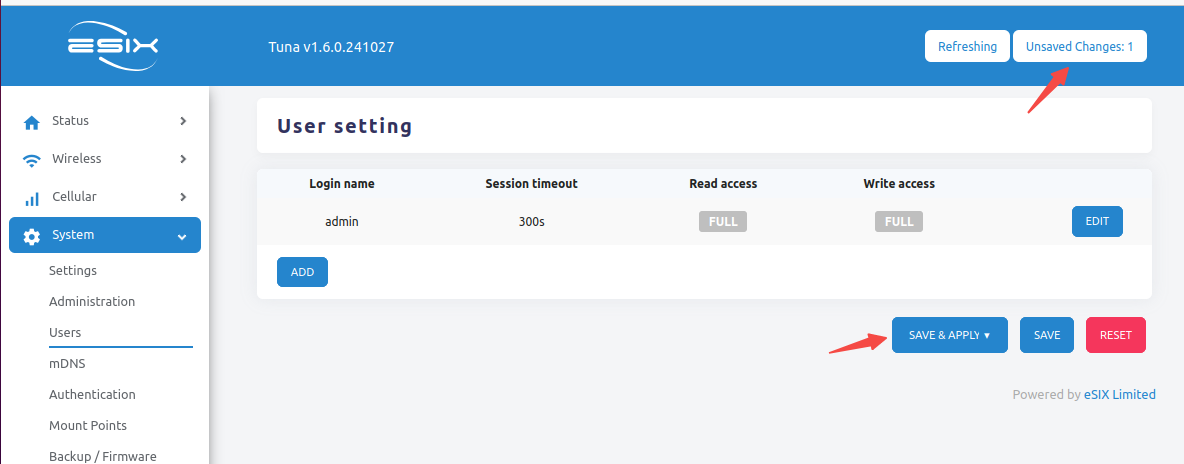
Please note that the right corner of the page shows "Unsaved Changes: 1", click the "SAVE & APPLY" button to commit the changes. The new password is take effect immedately!
3.1.3 Creating Additional User Accounts
Go to "System → Users", you will see the Users Setting page

3.2 Disabling or Connecting to SDM
Please note that all Xatellite series routers are set up to connect to the SDM cloud service for remote administration by default. If remote management is not required, please disable this feature by unchecking the corresponding option for enhanced security.
3.2.1 Disabling connection to SDM
You might disable the connection to SDM in order to avoid unauthorized access to the router remotely. Go to "Services → Central Admin" page, uncheck the Enable checkbox:
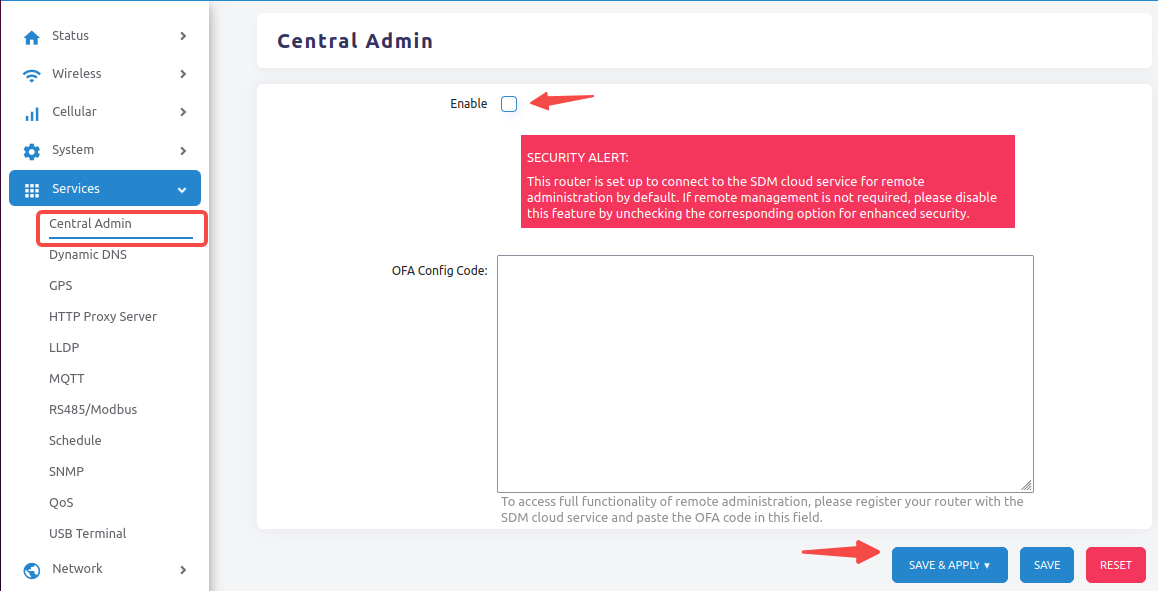
click the "SAVE & APPLY" button to commit the changes.
3.2.2 Connecting to SDM
Please consult your distributor for further instructions to setup the router for remote centralized administration.
4. Basic System Configuration
4.1 Setting Device Hostname & Timezone
By default, most of the Xatellite Series Routers are set to "xatellite" as the hostname. Go to "System → Settings" page, under the tab "General":
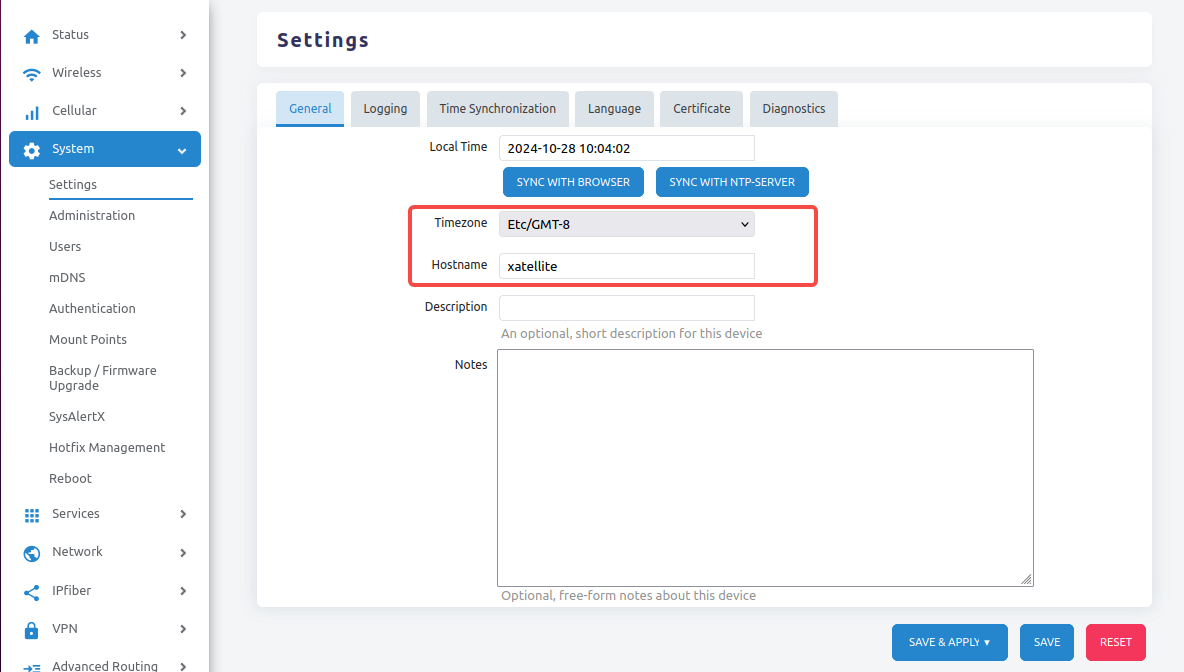
click "SAVE & APPLY" button to commit the changes.
4.2 Configuring Time Synchronization
By default, the NTP server candidates are set to .pool.ntp.org which is a big virtual cluster of timeservers providing reliable, easy to use NTP service for millions of clients, including this router. Go to "System → Settings" page, under the tab "Time Synchronization":
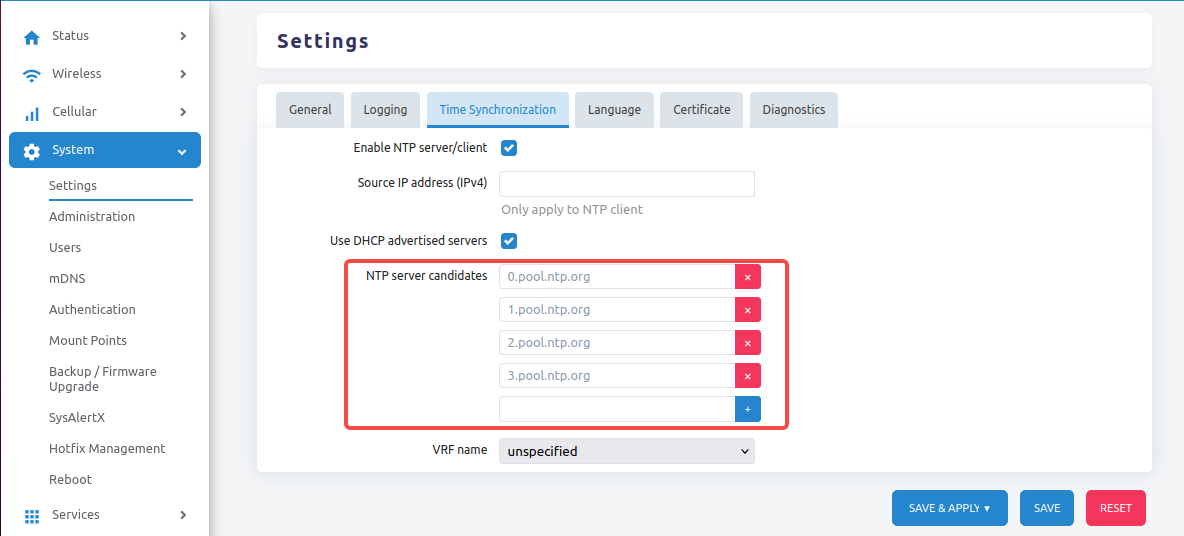
click "SAVE & APPLY" button to commit the changes.
4.3 Setting Interface Language
The router uses English by default and the language sets to "auto" for the browser. You might specify a language if the browser can not automatically determine correctly. Go to "System → Settings" page, under the tab "Language":
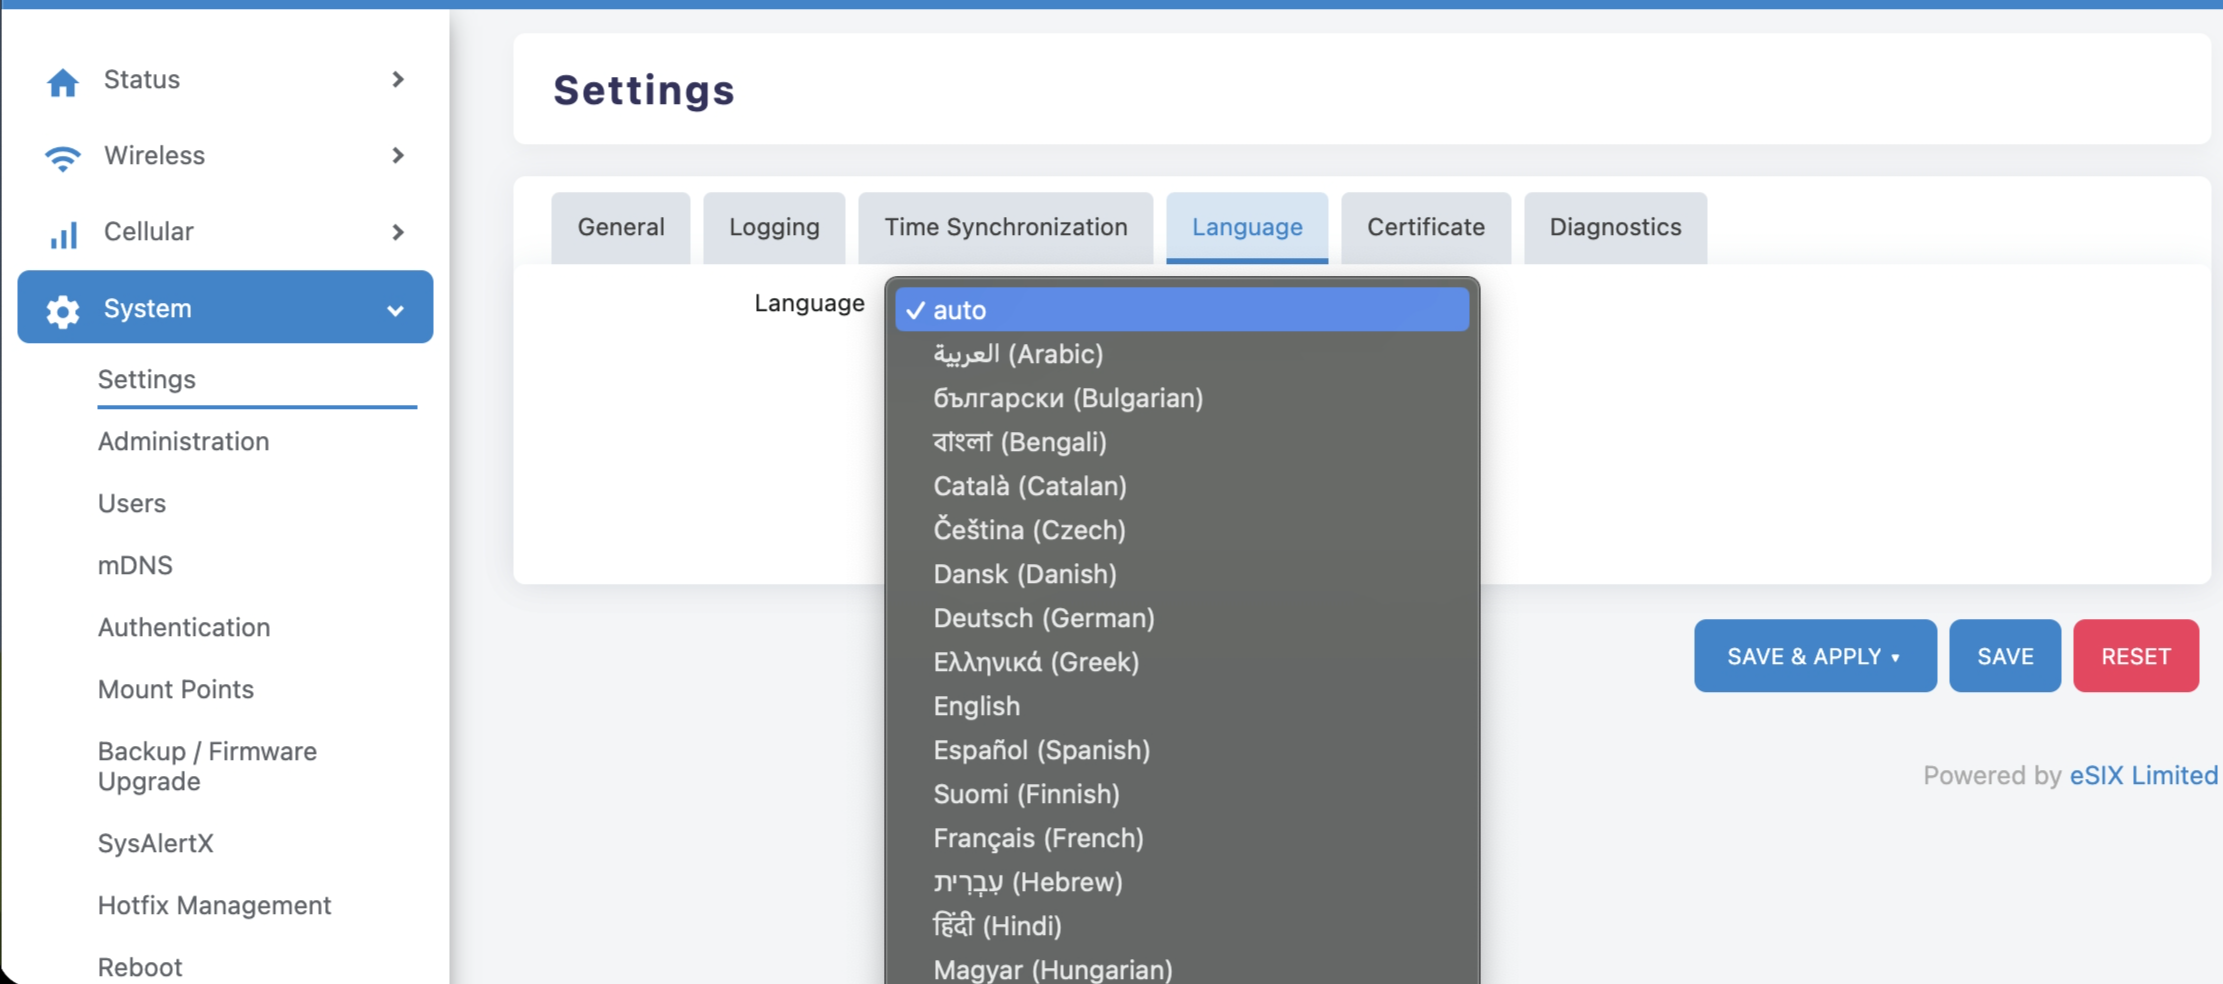
click "SAVE & APPLY" button to commit the changes.
5. System logging
The system logging facility is an important debugging/monitoring capability. By default, the system log is implemented as a ring buffer with fixed sized records stored in RAM. The reboot or power cycle of the router will cause system log lost. In order to retain the system log for debugging or monitoring, it can be streamed to system permenant flash memory or sent to remote log server through a TCP/UDP socket.
5.1 Streaming to system permanent flash memory
Go to "System → Settings" page, under the tab "Logging":

- Check the "Retain system log" checkbox for streaming the system log to the perment flash memory to avoid losing log histories
- Change the "System log buffer size", change to large size 10240 KiB (10MB) for trouble shootings.
ATTENTION: Retaining system log to the perment flash memory might shorten the life span of the flash memory. It is highly recommended to stream the system log to a remote log server.
click "SAVE & APPLY" button to commit the changes.
5.2 Streaming to remote log server
Go to "System → Settings" page, under the tab "Logging":
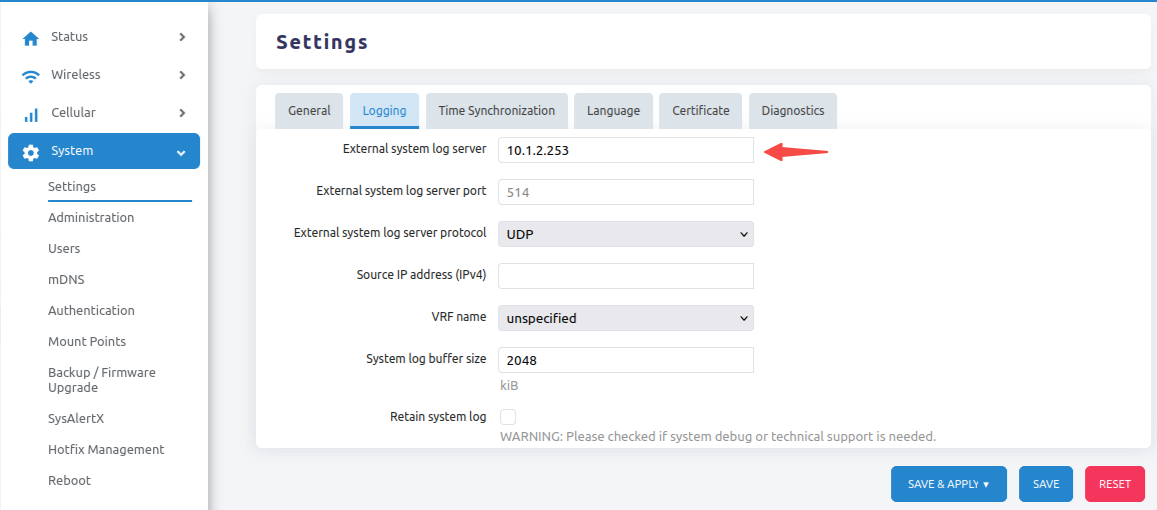
Enter the remote log server IP address and press the TAB key, hidden fields will show up and uncheck the "Retain system log" checkbox, leave the "System log buffer size" to default value (2048 KiB).
click "SAVE & APPLY" button to commit the changes.
6. Network Management
6.1 Changing default LAN IP address
You might change the default LAN IP address to suit your existing network management style.
WARNING
Changing the LAN IP address will immediately affect your connection to the router:
Your current web interface connection will be lost You will need to reconnect using the new IP address
Go to "Network → Interfaces" page:
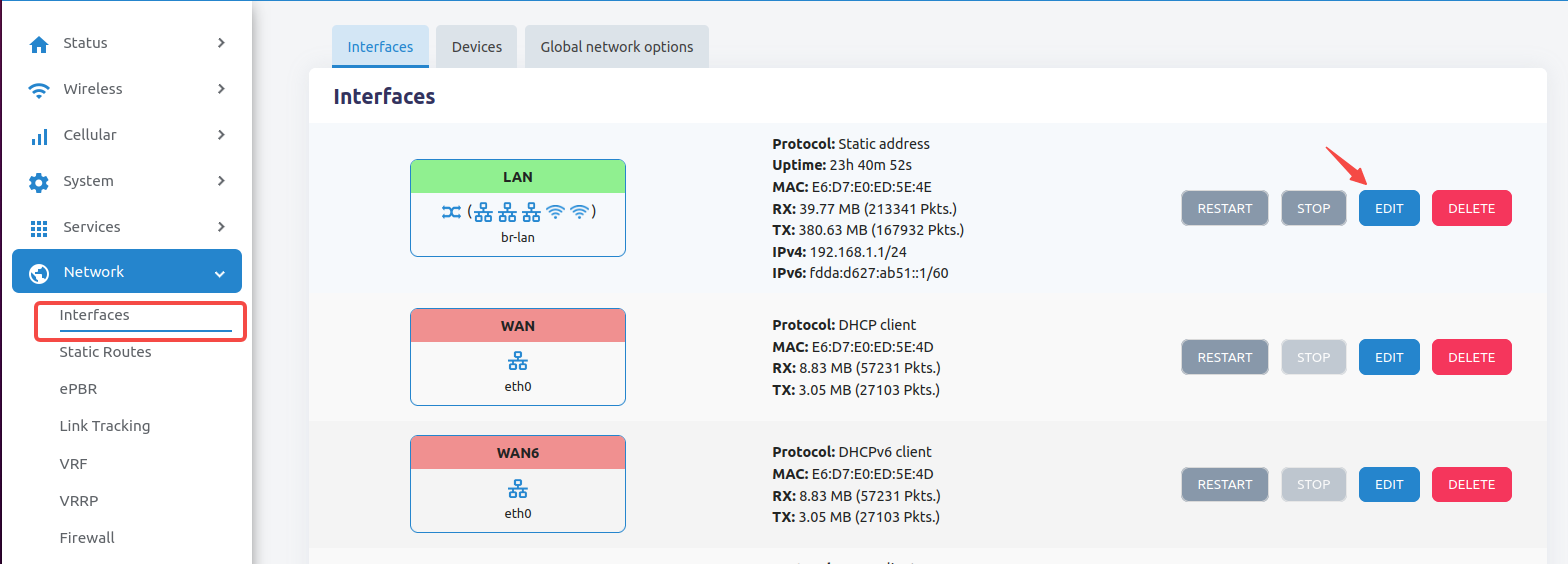
Locate the "LAN" and click the "EDIT" button, you will see:
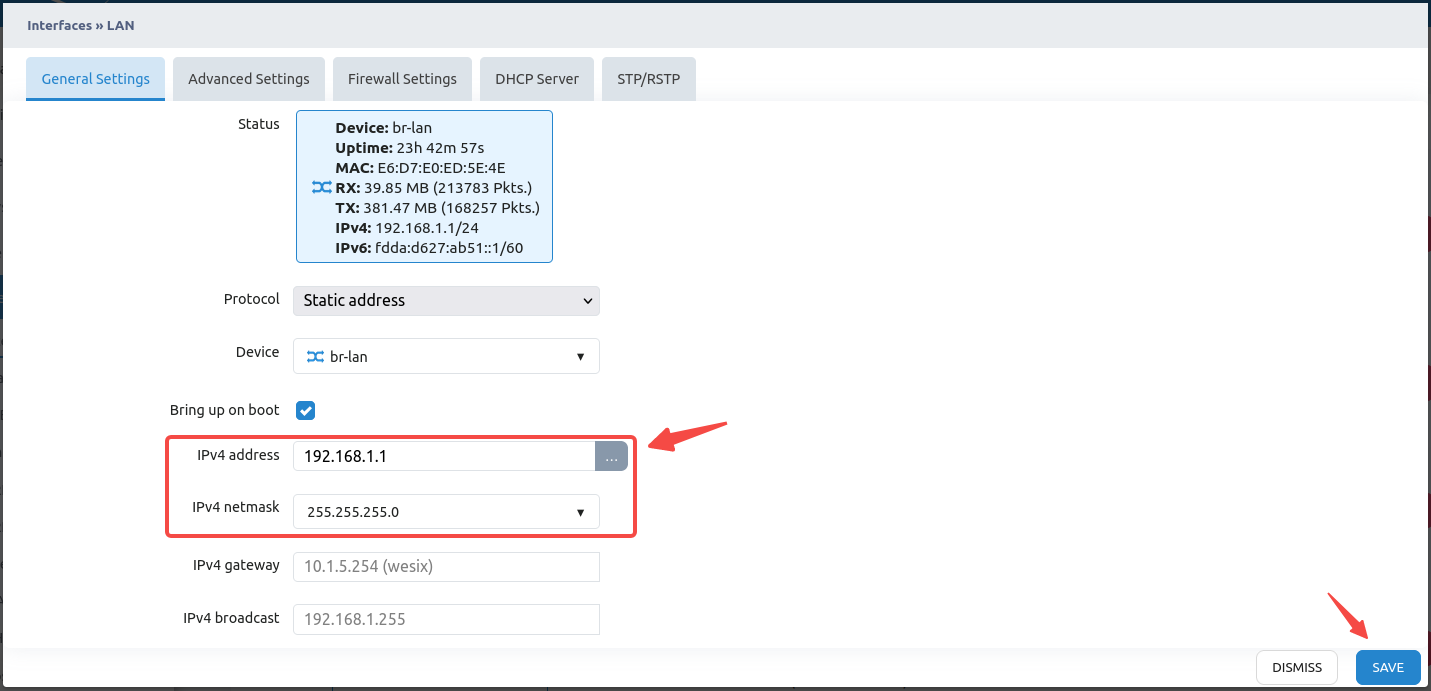
For example, the new IP address: 192.168.123.1 , click the "SAVE" button once the IP address or netmask has been changed. Then click the "SAVE & APPLY" button to commit the changes, a diaglog pops up:

Click the "APPLY AND KEEP CHANGES PERMANENTLY" button. Now you should type the new IP address, for example, https://192.168.123.1, you will see the login page again.
ATTENTION:
- It might take time for your PC (DHCP client) to acquire new IP address from the router.
- You might unplug and plug the Ethernet manually to refresh the new IP address.
- In a worse scenario, you might power off and on the router to re-establish the connection.
7. Wireless Configuration
The router has two radio transceivers if it supports WiFi 6: one for 5 GHz and one for 2.4 GHz.
7.1 Changing WiFi SSID & Password
Go to "Wireless → Configuration" page:
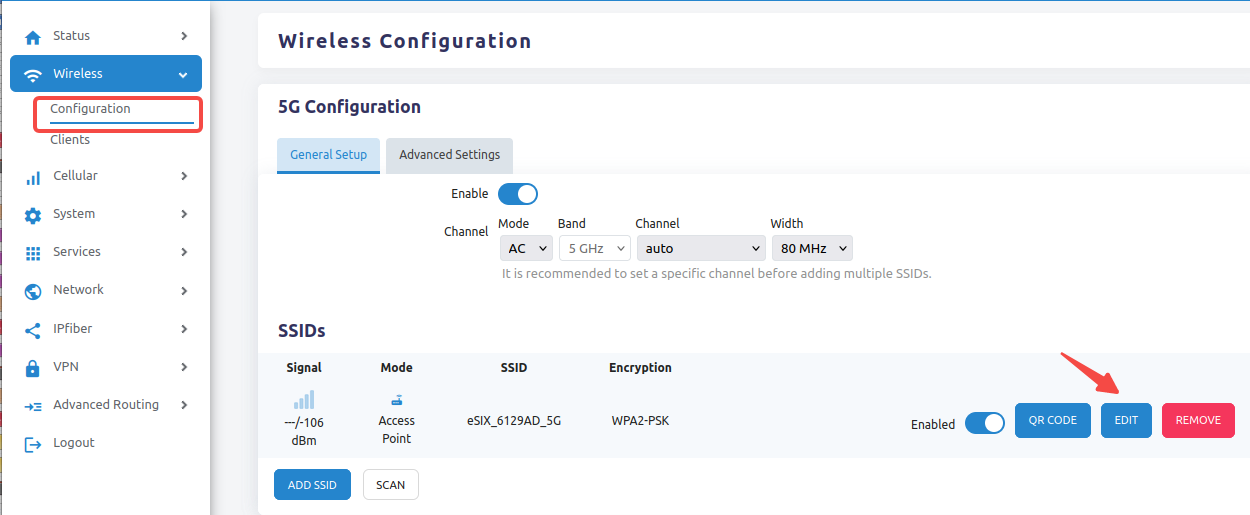
For example, changing the 5GHz default SSID to "example_5G", click the "EDIT" button:
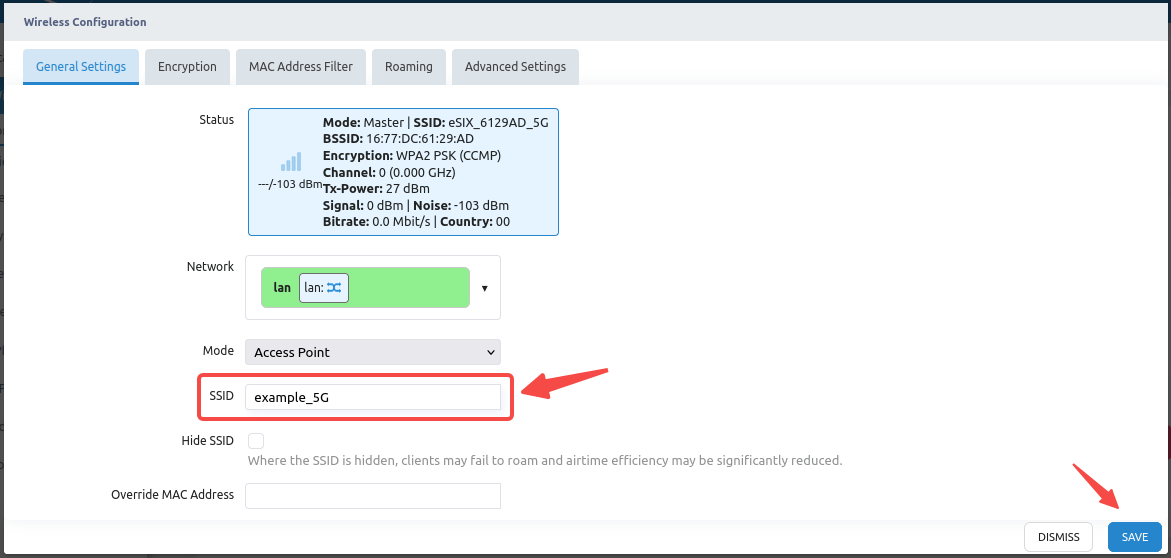
You might change the default password for this SSID, click the tab "Encryption":

Click the "SAVE" button to save all changes.
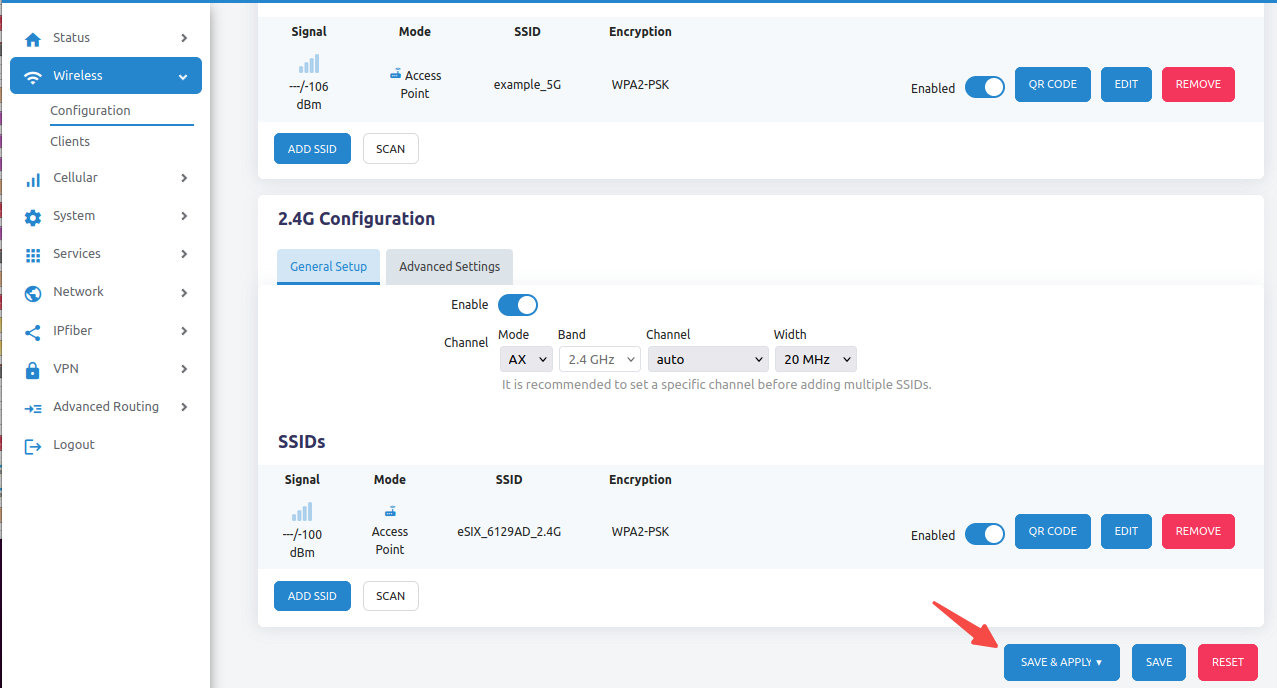
Finally, click "SAVE & APPLY" button to commit the changes.
-- END --