DMVPN
DMVPN Test Report
(DMVPN, GRE, IPsec)
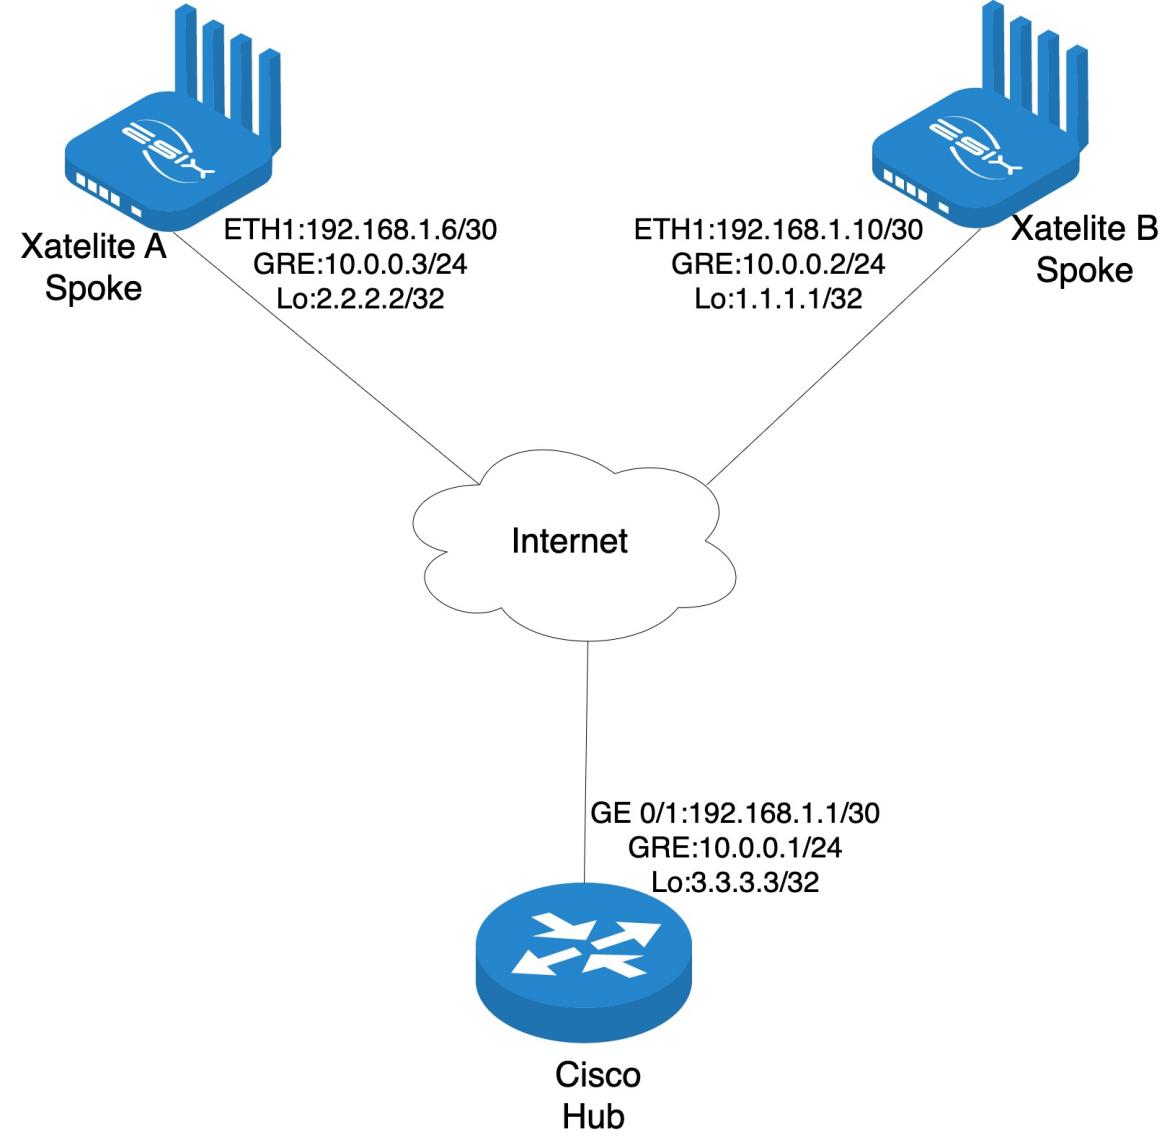
1. Topology
2. Expected result
- Build a DMVPN tunnel between to Xatellites and Cisco.
- DMVPN data is encrypted with dynamic IPsec.
- GRE interface IP addresses can ping each other.
- Loopback interface IP addresses can ping each other.
3. Equipment list
| Device | Model | Version | Note |
| Xatellite-A | Xatellite X86 | X86 v1.6.0.240924 | |
| Xatellite-B | Xatellite X86 | X86 v1.6.0.240924 | |
| Router | Cisco |
4. Procedure
Preparation
Set Xatelite A:
ETH0 IP address : ‘192.168.1.6/30’
Loopback IP address : ‘2.2.2.2/32’
Set Xatellite-B:
ETH0 IP address: ‘192.168.1.10/30’
Loopback IP address : ‘1.1.1.1/32’
Set Cisco Router:
GE0/1 IP address : ‘192.168.1.1/30’
Loopback IP address :3.3.3.3/32’
Note:Ensure that the devices in the underlay network can communucate with each other.
Configure Cisco as the DMVPN Hub
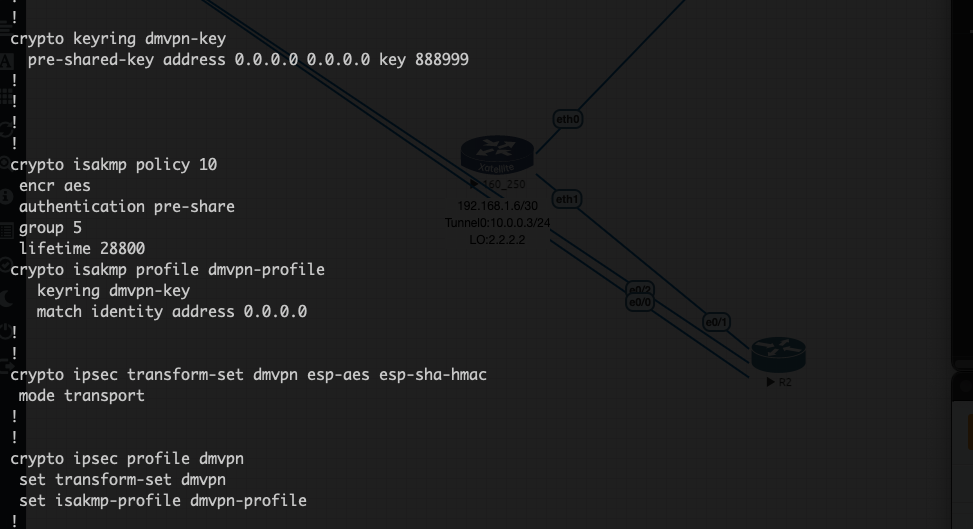
Configure IPsec information on Cisco
Configure ISAKMP (IKE Phase 1):
Define IKE policies.
Set encryption algorithms,hash methods,and DH groups.
Configure pre-shared key:
Specify the shared key to be used with the Spokes.
Configure IPsec Transform Set (IKE Phase 2):
Define the transform set with encryption and hash algorithms.
Configure IPsec Profile:
Associate the transform set with an IPsec profile.
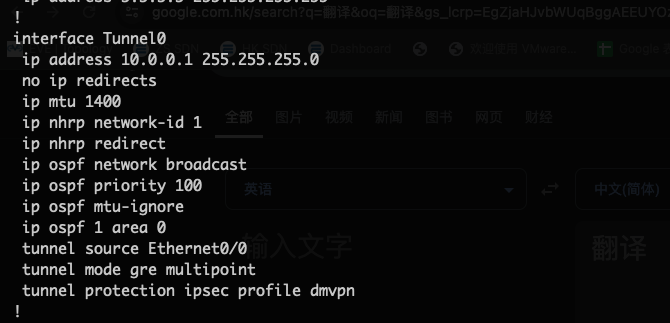
Create a GRE Tunnel and configure NHRP
Create a GRE Tunnel:
Specify the tunnel interface IP address.
Designate the physical interface as the tunnel source.
Configure the tunnel mode as multipoint GRE.
Configure NHRP Settings:
Set up NHRP mappings and networks.
Configure OSPF Dynamic Routing Protocol:
Enable OSPF on the tunnel and loopback interfaces.
Configure IPsec Encryption:
Apply the IPsec profile to the GRE tunnel interface.
Configure OSPF
Advertise Interfaces:
Include the Loopback and GRE interfaces in OSPF.

Create GRE Interface on Xatelite A and Xatelite B
Xatellite A
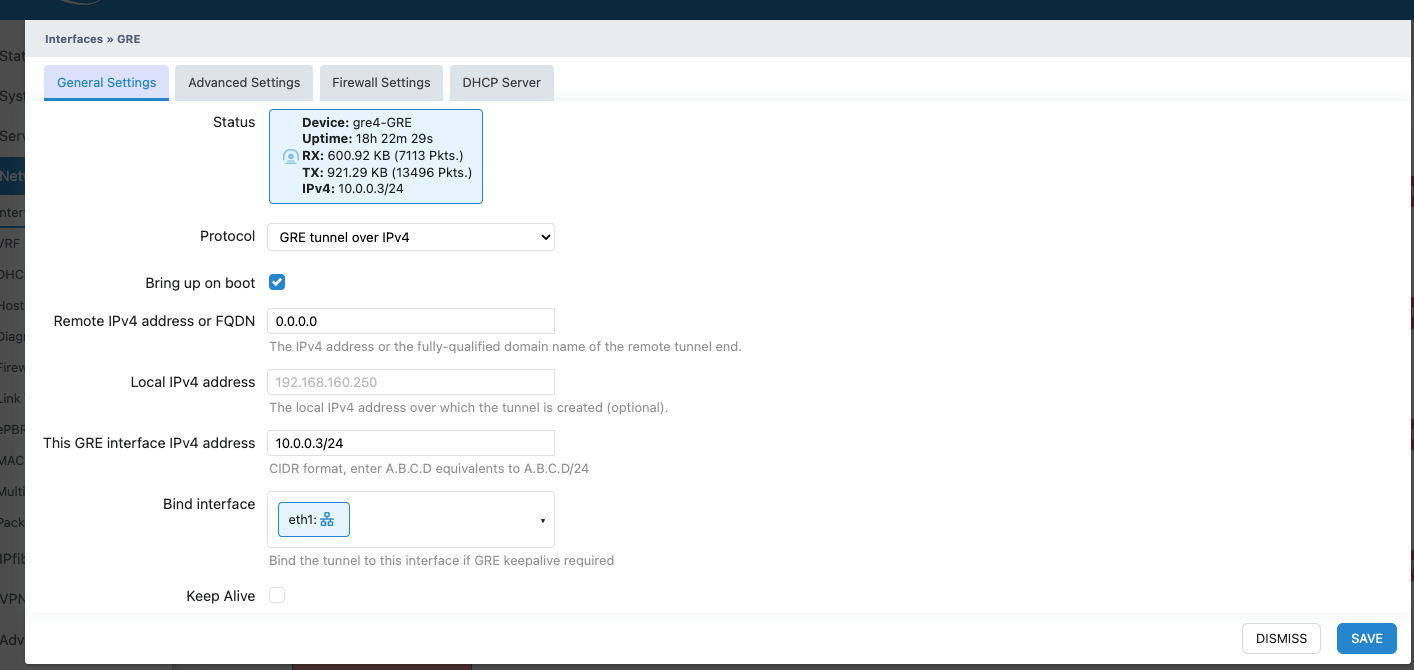
- Step 1: Log in to the WebUI on Xatellite A.
- Step 2: Navigate to Network -> Interfaces, click Add new interface....
- Step 3: Name the interface GRE, select GRE tunnel over IPv4 in the Protocol, then click Create interface.
- Step 4: In the settings dialog:
Remote IPv4 address or FQDN: 0.0.0.0
This GRE interface IPv4 address: 10.0.0.3/24
Bind interface: eth1
- Step 5: Click the Save button.
Xatellite B(Configure similarly to Xatelite A)
Steps: Repeat the same steps as Xatellite A with the following changes:
This GRE interface IPv4 address: 10.0.0.2/24
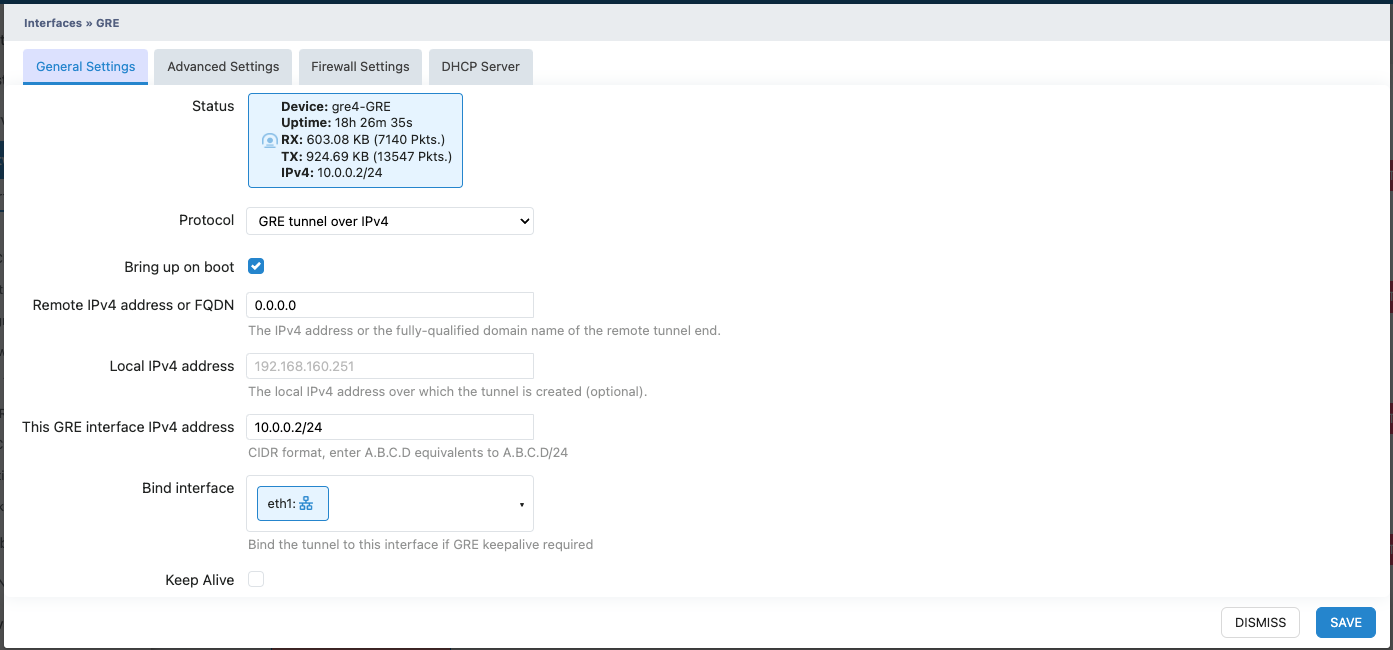
Create IPsec on Xatelite A and Xatelite B to secure the tunnel traffic
Create IKE Phase 1
(Xatelie A and Xatelite B have identical configurations,only the Xatelite A section is shown below)
Step 1: Log in to the WebUI on Xatellite A.
Step 2: Navigate to VPN -> IPsec -> Remote, click ADD... to create a new IPsec connection.
Step 3: In the configuration dialog:
Enable: Check the box to activate the connection.
Remote Gateway: 0.0.0.0
Pre-Shared Key: Enter the shared key (must match the Hub's settings).
Key Exchange: Select IKEv1.
Enable Phase 1 Proposal: Check the box.
Phase 1 Encryption Parameters:
Encryption Algorithm: AES128
Hash Algorithm: SHA1
Diffie-Hellman Group: Group 5
Step 4: Click the Save button.
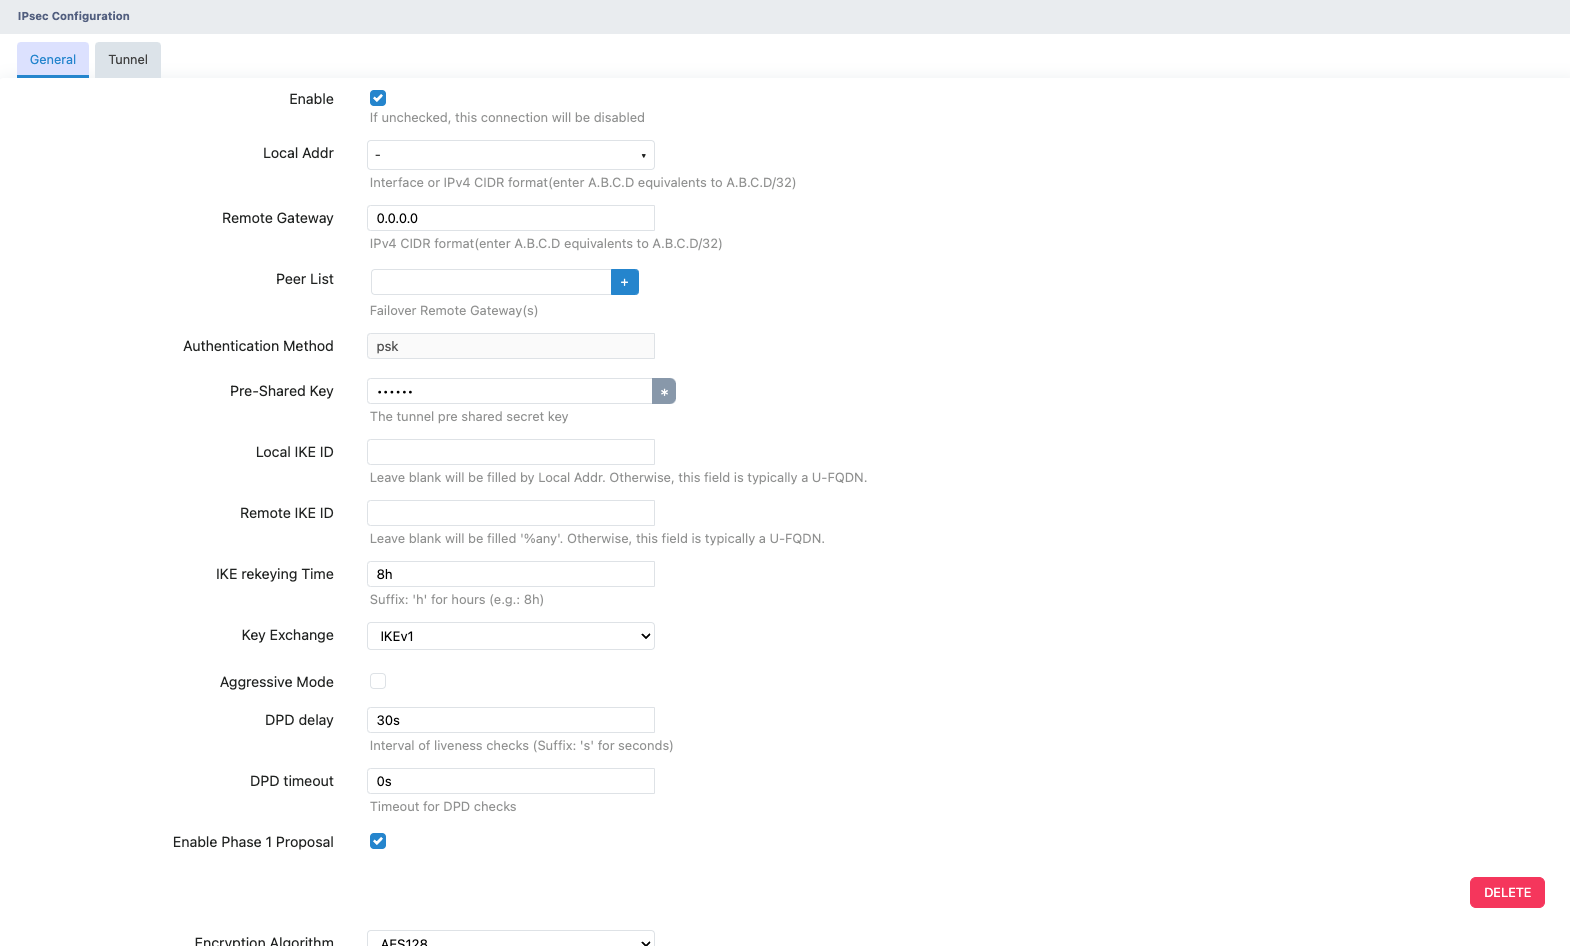

Create IKE Phase 2
Step 1: Click the ‘EDIT’ button of the previously created IPsec tunnel.
Step 2: At the top, select ‘Tunnel’, then click ‘ADD...’ to create IPsec Phase 2.
Step 3: In the configuration dialog:
- Enable: Check the box to activate the connection.
- Local Subnet: 0.0.0.0/0
- Remote Subnet: 0.0.0.0/0
- Mode: Select transport.
- Enable Phase 2 Proposal: Check the box.
- Phase 2 Encryption Parameters:
- Encryption Algorithm: AES128
- Hash Algorithm: SHA1
Step 4: Click the Save button.
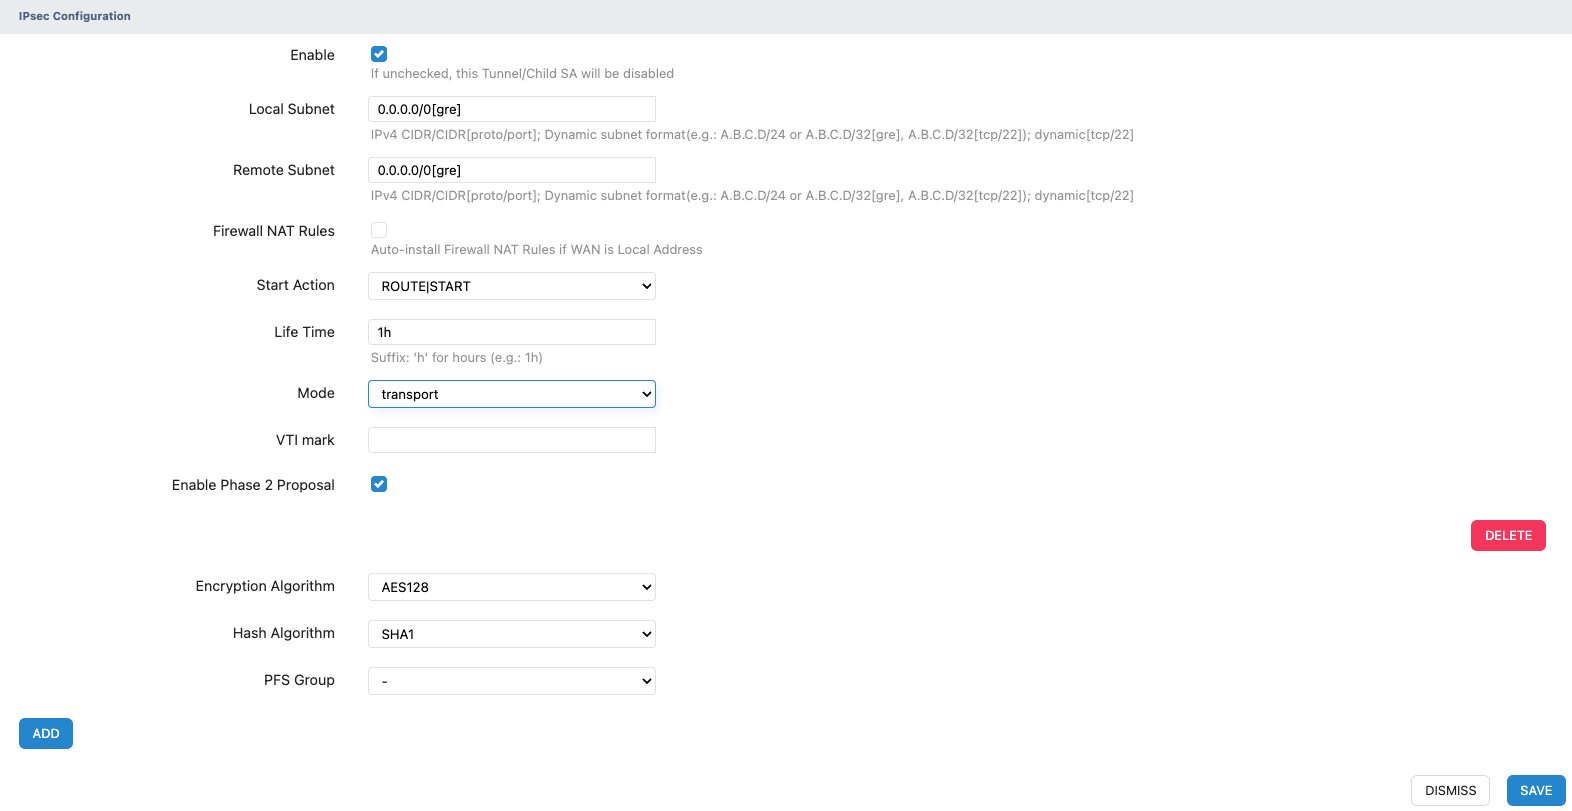
Display of the Completed IPsec Configuration
- Xatelite A

- Xatelite B

Set Xatelite A and Xatelite B in DMVPN Spoke Mode
Configure DMVPN
(Xatelie A and Xatelite B have identical configurations,only the Xatelite A section is shown below)
Step 1: Log in to the WebUI on Xatellite A.
Step 2: Navigate to VPN -> IPsec -> DMVPN, click ‘ADD NEW... ‘to create a DMVPN configuration.
Step 3: In the configuration dialog:
- Enable: Check the box to activate the DMVPN feature.
- Interface: Bind the newly created GRE interface as the DMVPN source interface.
- IPSec Tunnel: Select the newly created IPsec Profile.
- DMVPN Mode: Select Spoke.
- Map: Check the box to enable mapping.
- Protocol Address: Enter the GRE interface IP address of the Hub.
- NBMA Address: Enter the Hub's physical interface IP address.
- Enable the Following Options:
- Register
- Cisco Compatible
- Shortcut
- Non-Caching
- Multicast Type: Select dynamic.
Step 4: Click the Save button.
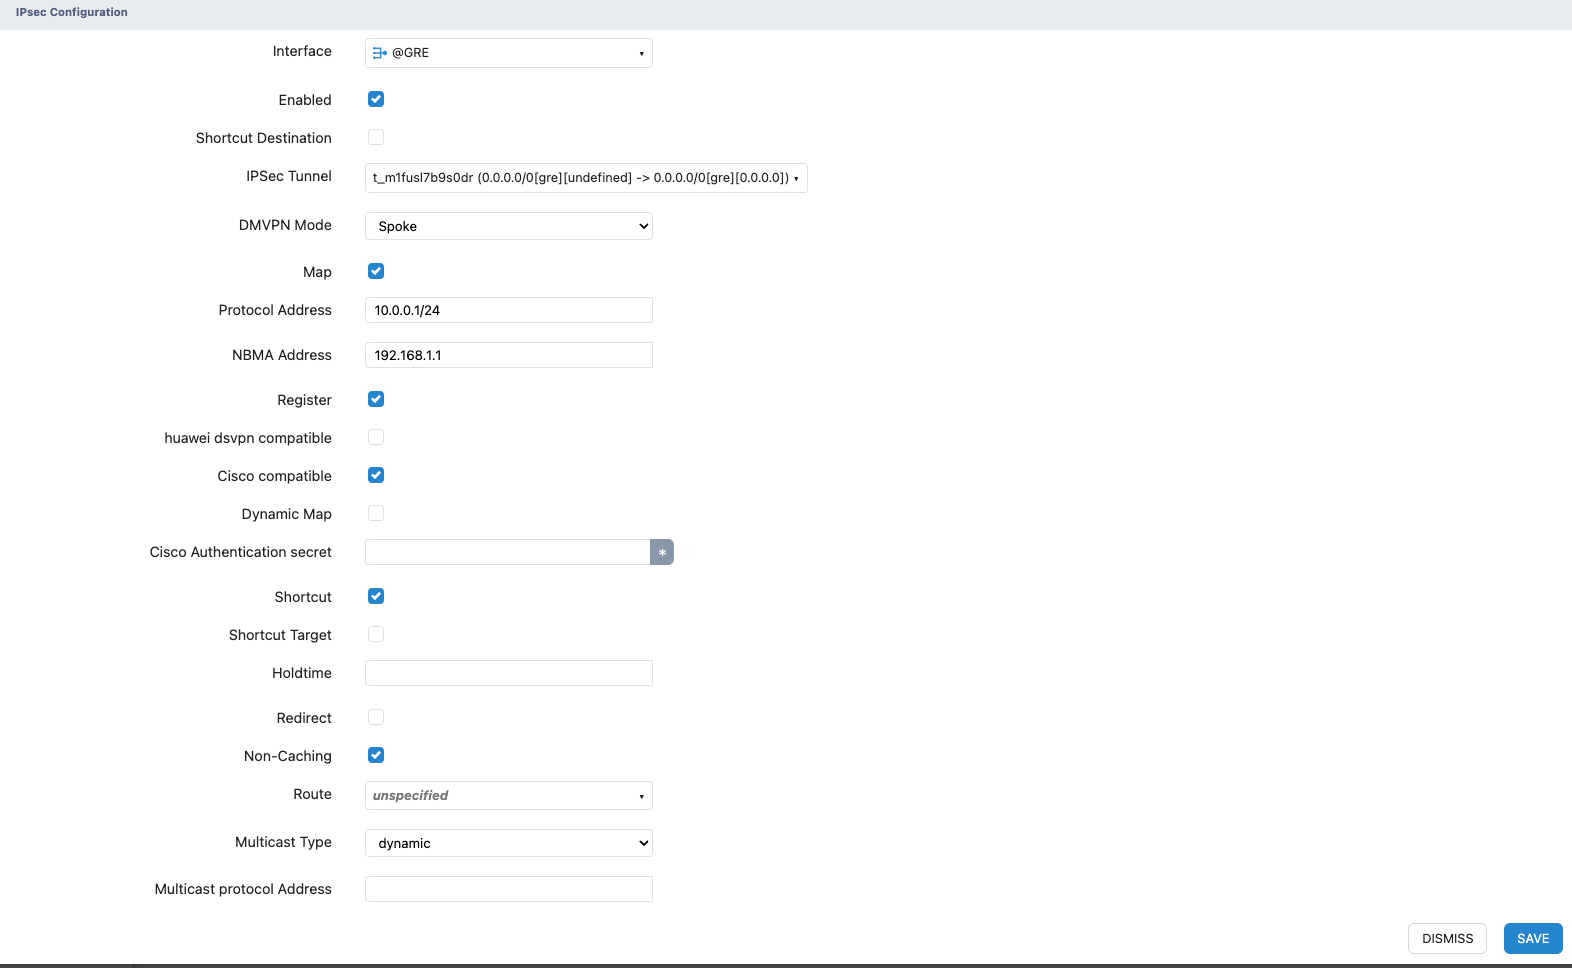
Display of the Completed DMVPN Spoke Configuration
- Xatelite A

- Xatelite B

Configure OSPF on Xatelite A and Xatelite B
Configure OSPF
(Xatelie A and Xatelite B have identical configurations,only the Xatelite A section is shown below)
Step 1: Log in to the WebUI on Xatellite A.
Step 2: Navigate to Advanced Routing -> OSPF -> INSTANCE, click Enable to activate OSPF.
Step 3: In the Router ID field, select or enter the Router ID.
Step 4: In the interface declaration section, click ‘ADD...’:
- Interfaces to Declare: GRE interface and Loopback interface.
- Area ID: Enter 0.
- Network Type: Select broadcast.
- Cost: Enter 0.
- MTU Ignore: Check the box.
Step 5: Click the Save button.
GRE Interface:

Loopback interface:

Display of the Completed OSPF Configuration
- Xatelite A

- Xatelite B

5. Test result and summary
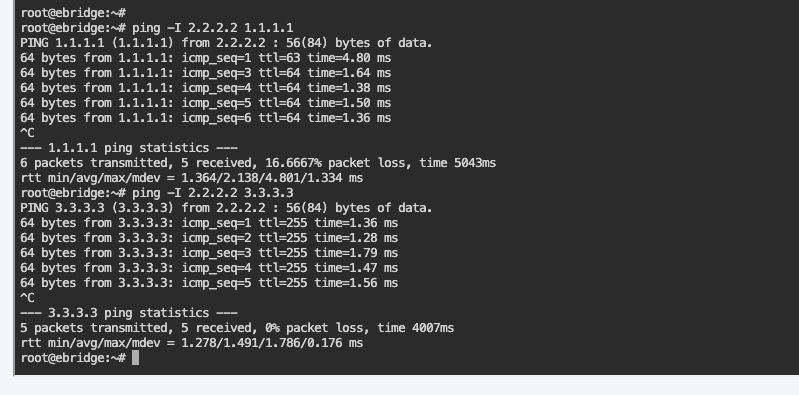
- Pass
- The Loopack IP addresses can successfully ping each other .
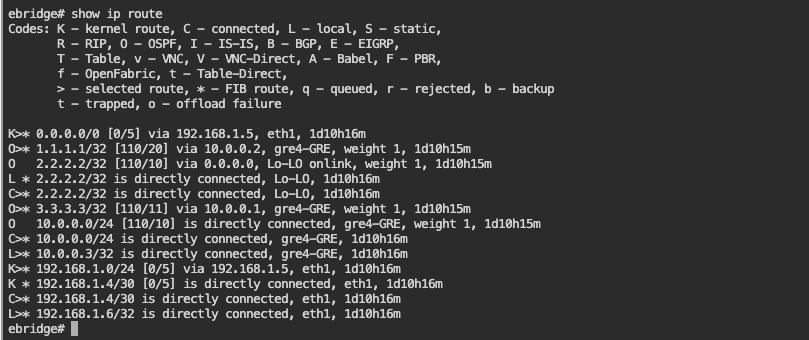
- Routes Advertised by OSPF:
- The routes are successfully exchanged via OSPF.
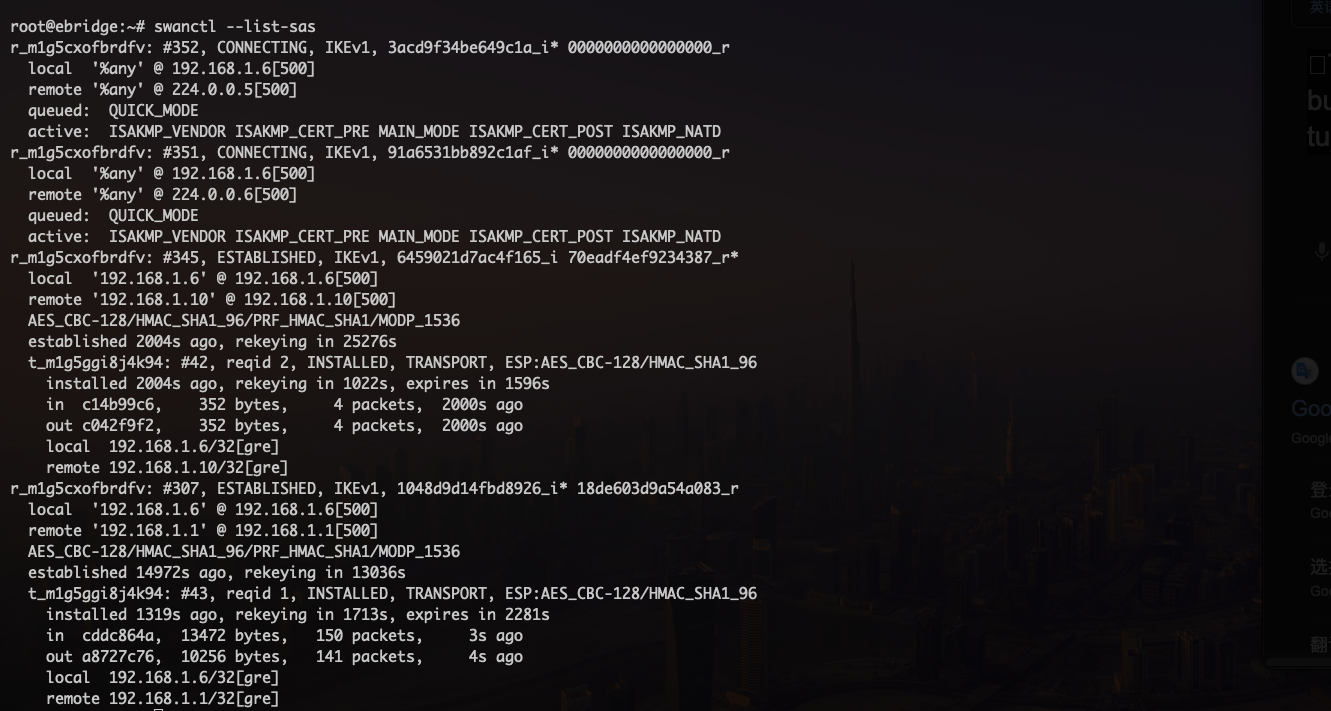
- Current VPN Security Association Status:
- Information abput DMVPN peers:
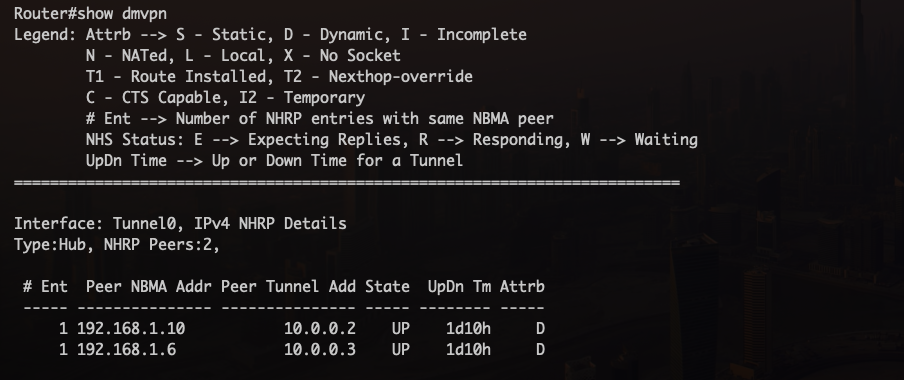
- Verification that the GRE Tunnel is Built Over the IPsec Tunnel:
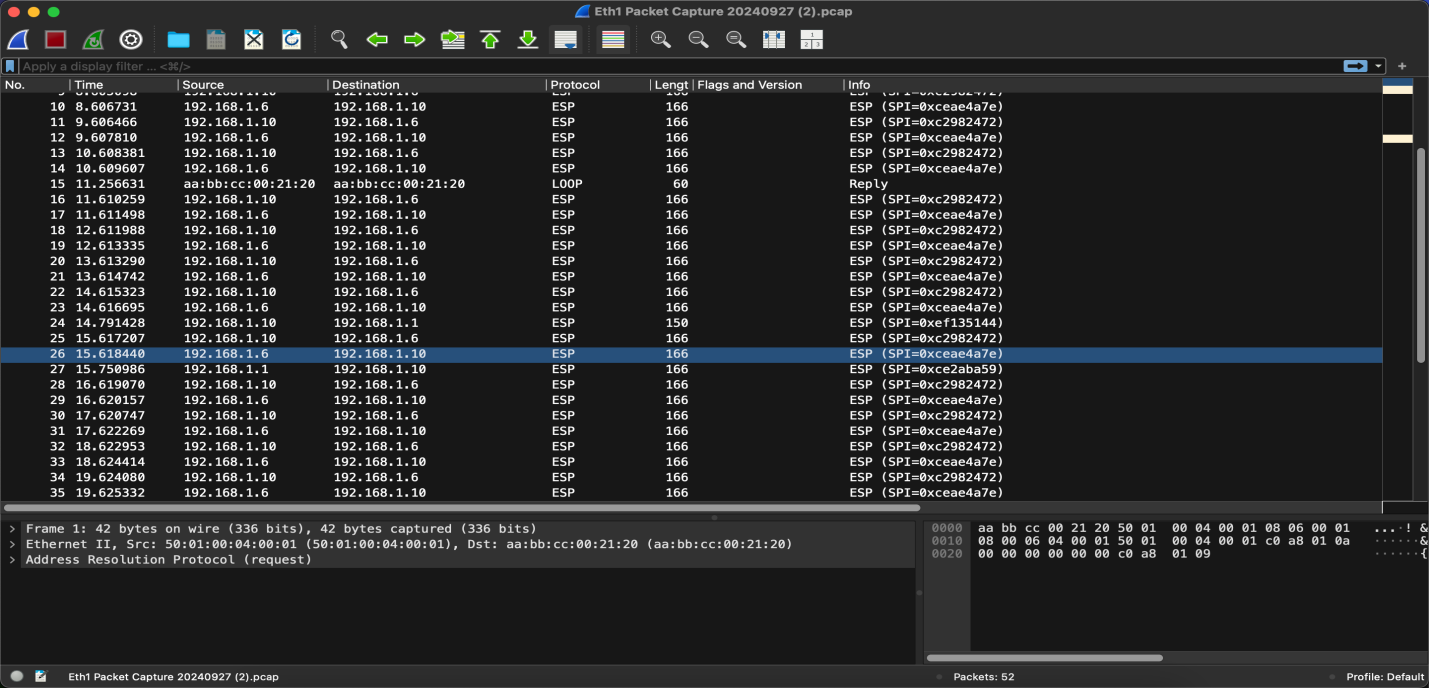
Summary:
The DMVPN setup between Xatellite A, Xatellite B, and the Cisco router was successfully configured and tested. The GRE tunnels are secured with dynamic IPsec encryption. Both the GRE interfaces and the Loopback interfaces on the Xatellites can communicate with each other, confirming the proper establishment of the DMVPN network and OSPF routing.